Mini orchids have definitively won the hearts of those who have little space but still want an impressive floral display. And, contrary to what many people imagine, mini orchids are not “toy plants”: they have the same structures and needs as larger orchids, but concentrated in small pots and delicate roots, which significantly changes how they must be cared for.
Micro vs. mini orchids: understanding the difference right from the start
In everyday trade, the terms “mini” and “micro” orchids are often used almost as synonyms, but there is an important practical difference:
When we talk about mini orchids, we are usually referring to miniaturized plants – orchids that often have a “standard” version, with a larger growth habit. The term “micro orchids,” on the other hand, is popularly used for orchid species that are naturally small, usually with flowers under about 0.4 in (1 cm) and plants that, even when mature, remain very compact.
In practice, these labels are more commercial than botanical. Professional growers tend to define “mini” or “micro” based on criteria such as plant size, flower size, and growth habit. In general terms:
- “Micro” usually refers to the smallest species among orchids, with tiny flowers and very delicate structures;
- “Mini” includes cultivated or hybridized plants bred to resemble standard orchids, but in reduced size, often reaching only a few inches to several inches (a few dozen centimeters) in height, while keeping compact proportions.
However, this is not always followed strictly, which means the same species or hybrid may appear as a “mini” orchid in one nursery and as a “micro” orchid in another, depending on size, lineage, and even growth stage. The key point is to understand that the smaller the orchid, its pot, and the volume of potting mix, the more sensitive it will be to watering, ventilation, fertilizing, and temperature changes.

Main types of mini orchids commonly found on the market
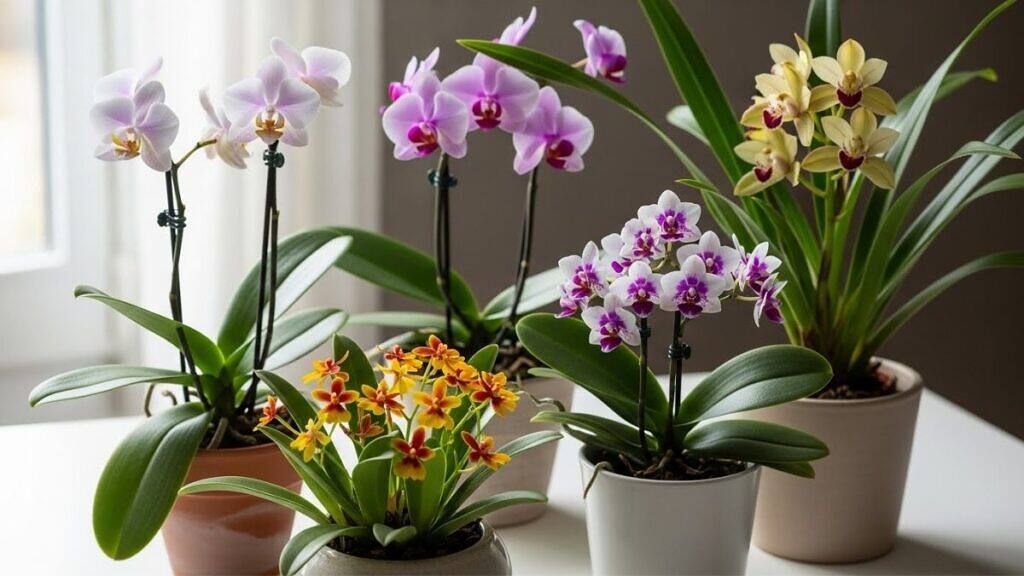
Today, there is a wide variety of miniature orchids available, most of them derived from genera already well known to orchid enthusiasts. Instead of chasing rare species, it is worth starting with groups that are already well adapted to indoor and balcony conditions, and that are consistently offered in florists, garden centers, and even supermarkets.
Mini Phalaenopsis: compact “butterfly” orchids

These are probably the most popular mini orchids. Traditional hybrid Phalaenopsis have been bred into compact forms, with proportionally shorter flower spikes and smaller blooms, often produced in great quantity.
In terms of growing conditions, they follow the same principles as standard-size Phalaenopsis: they are warm- to intermediate-growing orchids, mainly epiphytic, meaning that in nature they grow attached to tree trunks with their roots exposed to the air. In pots, this translates into a very free‑draining potting mix, excellent air movement around the roots, and moderate watering, avoiding waterlogged conditions.
Because they are smaller, mini Phalaenopsis are usually grown in small pots, which dry out more quickly. This requires close attention to the balance between not letting the plant go thirsty and not keeping the potting mix constantly soggy.
Mini Cattleyas and compact hybrids

Cattleyas are iconic among large‑flowered orchids, but the market now offers compact hybrid forms, with smaller pseudobulbs, shorter leaves, and blooms in a true miniature scale.
These miniature orchids are also, for the most part, epiphytic, adapted to life on trunks and branches. This means a very airy potting mix (pine bark, high‑quality coconut husk fiber, and a bit of sphagnum moss), plus constant ventilation. Pots are often clay or plastic with generous drainage holes, which helps balance moisture retention with fast drying.
When buying miniature Cattleyas, be careful not to confuse them with ordinary seedlings. Many young Cattleya plants are sold as miniatures but are simply juvenile standard varieties. To ensure you are getting a true miniature Cattleya, purchase plants that are already in bloom—your guarantee that they are mature, compact plants.
Compact dendrobiums: slender canes and abundant blooms

Compact Dendrobium orchids follow the same concept: plants with shorter canes and very heavy flowering, designed to fit comfortably into small spaces. Many compact dendrobium hybrids retain the hardiness of the genus, requiring bright, diffused light and dry intervals between waterings. The most common compact dendrobium types are hybrids of Dendrobium nobile (the well-known “noble dendrobium”) and Dendrobium phalaenopsis (Dendrobium bigibbum).
Because they have a relatively fine root system and are usually grown in small pots, these compact dendrobium orchids are sensitive to excess moisture in the potting mix (substrate). Careful attention to drainage and air circulation is essential to prevent root rot.
However, be careful not to fall into a common trap. It is very common to find flowering pseudobulbs stuck into tiny pots for sale. They work well as small gifts and look like true miniature plants, but they are not – they are cut canes from mature compact dendrobium plants. Most of them eventually die because they do not even have roots. If they do manage to root with excellent care, they will develop into normally sized dendrobium plants over time and will not keep that apparent miniature size.
Oncidium ‘Twinkle’ and Tolumnia: airy miniatures

Oncidium ‘Twinkle’ and compact Tolumnia orchids (Oncidium equitant) also frequently appear in miniature versions. In general, these compact dendrobium–style minis are epiphytic orchids adapted to very well-ventilated conditions with plenty of bright light, often corresponding to what, in nature, would grow on more exposed tree branches.
These mini orchids usually prefer even airier potting mixes, and can be grown mounted on pieces of wood, in slatted baskets, or in very open, ventilated pots that allow relatively fast drying – as long as this is combined with high ambient humidity.

Compact Paphiopedilum (mini “slipper” orchids)
Among terrestrial or lithophytic orchids, compact Paphiopedilum stand out for their unmistakable slipper-shaped blooms. Many compact hybrids are sold in small pots, with mottled or plain green foliage and highly refined flowers.
Unlike the epiphytic types mentioned earlier, Paphiopedilum prefer a potting mix closer to a light soil, rich in organic matter, with good moisture retention but without becoming waterlogged. They can be more sensitive to water quality and to the balance between humidity and air circulation, especially in miniature strains.

Mini Cymbidium: elegant flower spikes in compact form
Traditional Cymbidium orchids are renowned for their long, flower-laden spikes, widely used in the cut-flower trade. Mini Cymbidium versions keep this same appeal, but with much smaller clumps and pots, often grown as decorative indoor orchids in homes and offices.
These mini Cymbidium hybrids tend to have a strong terrestrial component, preferring potting mixes with higher water-holding capacity, mild climates and bright light, without intense direct sun during the hottest hours of the day.

Demanding mini orchids: Masdevallia, Miltoniopsis and some Paphiopedilum
Not every miniature orchid is easy to grow. Some groups commonly sold as mini orchids require very specific conditions, such as cool temperatures and very high humidity, which makes them challenging in warm interiors.
- Hybrids of Masdevallia with vivid colors, for example, need cool to moderately cool temperatures and consistently high humidity.
in very hot regions, they often require active climate control;
These groups of mini orchids are better suited to collectors who already master the cultivation of more resilient miniature orchids and who can provide a properly climate‑controlled growing area.

How to grow mini orchids: what changes compared to standard orchids
In theory, mini orchids and large orchids share the same biology. In practice, the smaller pot and root system make mistakes show up much faster. A few factors change in a decisive way.
Small pots, big consequences: choosing the container and the potting mix
The first impact of the reduced size is the volume of potting mix. Small pots mean less reserve of water and nutrients, and much faster drying. When choosing the container, consider:
- Plastic pots with plenty of drainage holes or partly transparent sides make it easier to visually monitor root moisture (very useful in your first experiences with mini orchids);
- Unglazed clay pots allow quicker drying, which is ideal for miniature orchids that dislike excess water;
- Slatted baskets or mounts on pieces of wood are good options for epiphytic mini orchids that enjoy very well‑aerated roots.
The potting mix must be adjusted to the orchid’s growth habit:
- Epiphytes (Phalaenopsis, Cattleyas, many Dendrobiums, Oncidiums and Tolumnias) require a very free‑draining mix, based on pine bark or a similar material, which can be combined with coconut fiber and a small portion of sphagnum moss to hold some moisture without becoming waterlogged;
- Terrestrial or lithophytic orchids (Paphiopedilum, many miniature Cymbidiums) prefer a finer mix, rich in organic matter and with good water‑holding capacity, but always structured so it does not compact excessively.
A golden rule for mini orchids: more important than “filling the pot” is ensuring that air can move freely between the particles of the potting mix. Suffocated roots in tiny containers are a sure recipe for problems.
For a deeper dive, explore these pot selection tips for orchids.
Watering and drying: how to avoid both thirst and root rot
Research from floriculture institutions indicates that mini orchids can show higher survival rates indoors when compared to standard-sized plants, partly because they need less water and a smaller volume of potting mix. This reduces the risk of roots staying waterlogged for long periods.
On the other hand, that same small volume makes the plant dehydrate more quickly in dry environments. Watering mini orchids is therefore a delicate balance:
- Check the potting mix frequently: feel it with your fingers; if it is just slightly moist, it is time to start planning the next watering;
- Avoid fixed schedules (“water every Tuesday and Friday”); instead, watch for actual drying, which varies with the season, air circulation, and pot size;
- In hot weather, tiny pots can dry out in one or two days, while in cooler conditions they may take several days to reach the right point for watering again.
Mini orchids do not like to sit with their roots soaked, but they also do not tolerate staying completely dry for long periods. Ideally, alternate between thoroughly moist and almost dry potting mix, without allowing it to remain bone-dry for too long. You can also apply general orchid care tips that work for both miniature orchids and standard-sized plants.
Fertilizing miniatures: less is more
Because the volume of potting mix is small, the concentration of fertilizers and soluble salts in mini orchids increases easily. This can burn fine roots and slow down growth. Some practical guidelines:
- Use lower doses than those recommended for orchids in general, and compensate, when necessary, with slightly more frequent applications;
- Choose very diluted solutions, applied after lightly moistening the potting mix beforehand, to avoid osmotic shock to dry roots;
- Flush the pot periodically with clean water to remove excess accumulated salts.
Healthy mini orchids respond well to balanced fertilizing, but if you are unsure, it is safer to err on the side of a moderate lack rather than overfertilizing.
Light, airflow, and humidity: microclimate matters
Although each genus has its own preferences, most mini orchids commonly sold in garden centers appreciate bright, indirect light, similar to a bright window with filtered sun. Constant airflow is crucial, especially for epiphytic mini orchids with exposed roots or growing in very airy potting mixes.
Moderate to high air humidity helps mini orchids significantly.
In dry indoor environments, a few simple strategies can improve conditions:
- Trays filled with pebbles and a little water, always keeping the pot above the water level;
- Grouping pots together to create a small humid “pocket” around the plants;
- Avoiding very hot, dry drafts blowing directly on miniature orchids.
The concept of a microclimate is useful here: even in an apartment, small adjustments in placement (closer to or farther from the window, changing shelves) can create noticeable differences in light, temperature, and humidity that make all the difference for a mini orchid. Indoor orchids in general can benefit greatly from fine-tuning their environment.
Post-purchase acclimation: don’t change everything at once
Almost every mini orchid sold commercially has been grown in professional greenhouses with controlled light, humidity, and fertilization. Once it arrives at your home, the plant is subjected to a sudden change of environment. To reduce stress:
- Initially keep the mini orchid in a bright location, but protected from intense direct sun;
- Avoid repotting immediately, unless the potting mix is clearly deteriorated;
- Observe the plant for a few weeks before making drastic changes in placement, light, or watering schedule.
Gradual acclimation helps the miniature orchid adjust to new light and airflow conditions, reducing the risk of leaf drop or bud blast.
Repotting and handling fine roots

With orchids in general, repotting should be done very judiciously, and with mini orchids this is an even more delicate operation: any damage to the roots represents a proportionally greater loss for the plant.
Some general guidelines:
- Repot only when truly necessary (when there is no more room for the plant to grow in its container).
- Schedule repotting for periods of active growth, when the orchid is producing new roots;
- Gently remove as much of the old potting mix as possible, while preserving the maximum amount of healthy roots;
- Trim only visibly dead or rotten roots, using a sterilized tool;
- Remove spent flower spikes (they draw energy that should be directed to new root growth);
- Avoid “digging up” or disturbing the plant frequently; each handling is more stressful for mini orchids.
- If you divide the plant, keep at least three pseudobulbs together per division. Resist the temptation to make many small divisions, as single bulbs grow slowly, become weak, and often die.
When repositioning the orchid in the new pot, keep the planting level similar to the original one, without burying the base of the pseudobulbs or the plant’s crown. Fine roots appreciate stability but never excessive compression of the potting mix. Secure the plant to the potting mix with wire or string, and remove the support only after the mini orchid has rooted firmly.
Specific care by growth habit: mini epiphytic vs. terrestrial orchids
The difference between epiphytic and terrestrial orchids is one of the most important points for successful growing, especially with mini orchids. Overall, the Orchidaceae family is predominantly epiphytic, but there are significant groups of terrestrial and lithophytic species. Understanding this helps avoid basic mistakes in potting mix and watering.
Mini epiphytes: roots that need to breathe
Mini Phalaenopsis, mini Cattleyas, many compact Dendrobiums and Oncidiums Twinkle/Tolumnias are examples of mini orchids with a predominantly epiphytic growth habit. In their natural habitats, they live on tree trunks, branches, or rocks, with their roots exposed to the air and receiving water and nutrients from rain, mist, and accumulated organic matter.
In pots, this translates to:
- A coarse potting mix, with clearly visible air spaces between particles;
- Relatively quick drying between waterings;
- Constant air movement, avoiding pockets of stagnant moisture.
These roots are adapted to receive air first and water second. When mini orchid roots are kept in dense, constantly wet potting mixes, they tend to rot easily.
Mini terrestrial and lithophytic orchids: more stable moisture
Compact Paphiopedilum and many mini Cymbidium hybrids behave differently. These are mini orchids that, in nature, grow in well-drained soils or on rocks covered with organic material, living with greater contact between roots and the surrounding medium.
For these mini orchids, the ideal is:
- A finer potting mix, rich in organic matter yet still structured enough to allow effective drainage;
- Keeping moisture more stable, avoiding both prolonged, complete drying and waterlogging;
- Special attention to water quality in more sensitive groups, such as some miniature Paphiopedilum.
In this case, the most common mistake is treating the roots as if they were from typical epiphytic mini orchids, using an excessively coarse potting mix and allowing long periods of absolute dryness, which causes loss of fine roots and overall weakening of the plant.

Common mistakes that most often kill mini orchids at home
Over time, it becomes clear that most problems with miniature orchids do not come from a lack of “secret” techniques, but from a few repeated misconceptions. Among the most frequent with mini orchids, the following stand out:
- Too much water in tiny pots: the reduced volume of potting mix becomes saturated quickly; just a few heavy waterings are enough to rot practically the entire root system. Never leave a saucer filled with water under your mini orchid pot;
- Pots that are too large “to let it grow”: mini orchids do best in pots that are proportional to the plant; placing a small orchid in an oversized pot holds excess water and slows development;
- Lack of ventilation around the roots: cachepots without drainage holes, saucers full of water, and cramped corners with no air circulation all favor fungi and bacteria;
- Sudden exposure to strong direct sun: many mini orchids come from protected greenhouse conditions; placing them directly in a sunny window causes burns on leaves and flowers;
- Concentrated fertilization: high doses in a small amount of potting mix result in root burn and scorched leaf edges;
- Trying cool-growing species in hot climates without temperature control: Masdevallia, some Miltoniopsis, and certain delicate hybrids simply do not stay healthy in constant heat.
Avoiding these mistakes already puts the beginner mini orchid grower at an advantage, even without advanced techniques.
Mini orchids for beginners and mini orchids for more experienced growers
Not all miniature orchids demand the same level of experience. When building a first collection of mini orchids, it is best to prioritize groups that are more adaptable to typical indoor conditions in houses and apartments.
For beginners, the most promising options usually include:
- Mini Phalaenopsis hybrids, well adapted to bright, indirect indoor light;
- Compact Dendrobiums, known for being hardy when grown with good indirect light and moderate watering;
- Compact Oncidiums or Tolumnias, as long as they receive excellent air circulation and careful attention to the drying of the potting mix.

For growers who already manage watering, light, and humidity in miniature orchids very well, it is possible to move on to more sensitive groups, such as:
- Mini Cattleyas selected for home growing, with reasonable tolerance to variations in light and humidity;
- Miniature Paphiopedilum hybrids, which are more demanding regarding water quality;
- Mini Cymbidiums in regions with milder climates, with carefully adjusted light and temperature;
- Miniature Masdevallia and Miltoniopsis, provided you can ensure consistently cool conditions and high humidity.
At this stage, growing mini orchids is no longer just decorative; it starts to involve managing the environment, temperature, and even climate-control equipment in some cases.
Mini orchids in décor and everyday life
Beyond the pleasure of growing them, mini orchids have strong ornamental appeal. Because they require little horizontal space, they make it possible to create arrangements on shelves, wall-mounted supports, and small tables—something more difficult to achieve with large pots.
Their compact size also makes it easier to design specific growing corners with customized microclimates—for example, a group of pots near the brightest window in the home, sharing a humidity tray and gentle air movement.
From a botanical perspective, mini orchids are full members of the Orchidaceae family, just on a smaller scale. Understanding this foundation helps you see beyond the “cute plant,” and grasp the reason behind each type of care: roots adapted to air or to a specific growing medium, leaves that reveal light preferences, and pseudobulbs that store water and nutrients.
Putting it all into practice: strong, blooming mini orchids
Properly caring for mini orchids is largely an exercise in observation and fine-tuning. When you understand their growth habit (epiphytic or terrestrial), choose a suitable potting mix, and respect the limits of a small pot, you already solve most of the common problems encountered with mini orchids.
If you want to get started now, a good strategy is to choose one or two miniature orchids from groups known to be more adaptable, place them in a bright spot protected from extremes, and pay close attention—mentally or even in a notebook—to how they respond to watering, light, and the surrounding environment over the course of several weeks.
Over time, reading your miniature orchids becomes more intuitive: leaves that lighten or darken, roots that look active or withdrawn, buds that form and open regularly. From that point on, adding new species to your collection becomes a natural next step, not a leap in the dark.
Whether it’s a single mini Phalaenopsis on the windowsill or a tray filled with compact Cattleyas, Dendrobiums and Paphiopedilum, the most important step is simply to begin—ideally with attention to detail and a willingness to closely observe every response from your plants. Miniature orchids reward this careful approach with frequent blooming cycles and a constant sense of discovery in a small, manageable format.