I must confess a somewhat embarrassing truth: for years, I looked with a hint of envy at those who had a worm bin at home. I thought it was something for people who lived in the countryside, where there was ample space and thus, many possibilities for experimenting in the garden. It was only when I gathered the courage that I realized: setting up a homemade worm bin is easier than watering a fern pot. And the best part — within a few months, I was throwing much less garbage on the street and harvesting one of the richest and most bioactive fertilizers on the planet right from my garage.
If you have followed up to here, it’s because you are also tired of seeing banana peels, coffee grounds, and kale stalks being taken away in the garbage truck. Join me and I will show you, calmly and in great detail, how to set up your own system with three boxes—a simple, efficient system that fits in an apartment’s laundry area, the balcony of a house, or the garage.
Why worms? The secret of those who have been composting for years
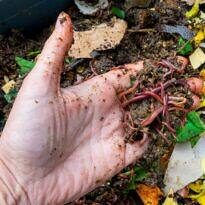
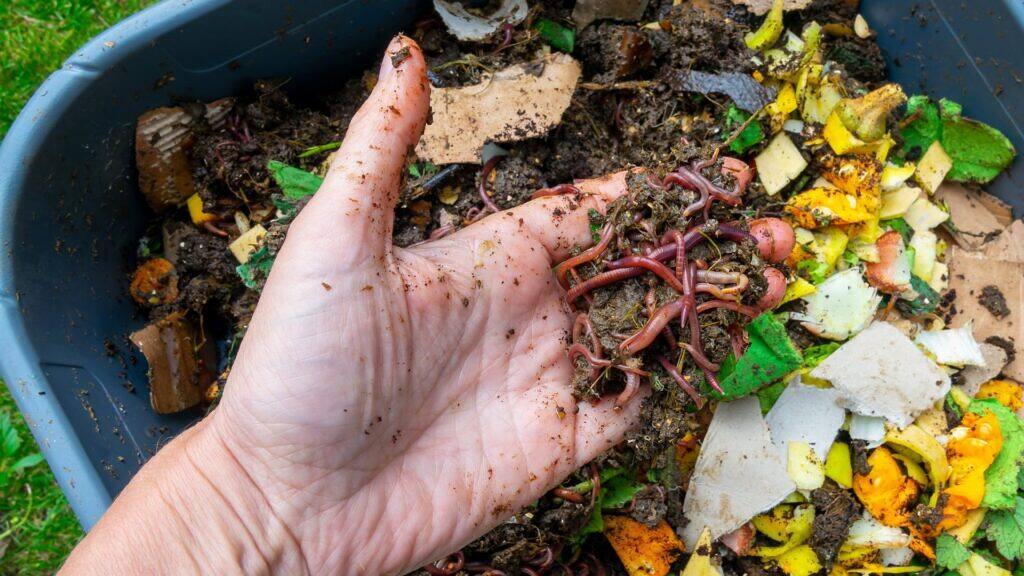
Vermicomposting is nothing more than composting on steroids: instead of just letting fungi and bacteria break down the organic matter, you invite worms to join the feast. And they eat fast. Very fast. A well-fed California red worm consumes, per day, an amount equivalent to its own weight in organic matter.
That is, one kilogram (2.2 lbs) of worms can handle one kilogram of scraps every day. This is why I always recommend the worm system for those living in small houses: it processes more material in less space, does not require the heavy stirring of traditional composting (the worms do the aerating themselves), and still delivers two highly valuable final products — the humus and the liquid biofertilizer (known as “leachate,” which only has an unpleasant name), rich in active substances for plants and soil, such as humic acids.

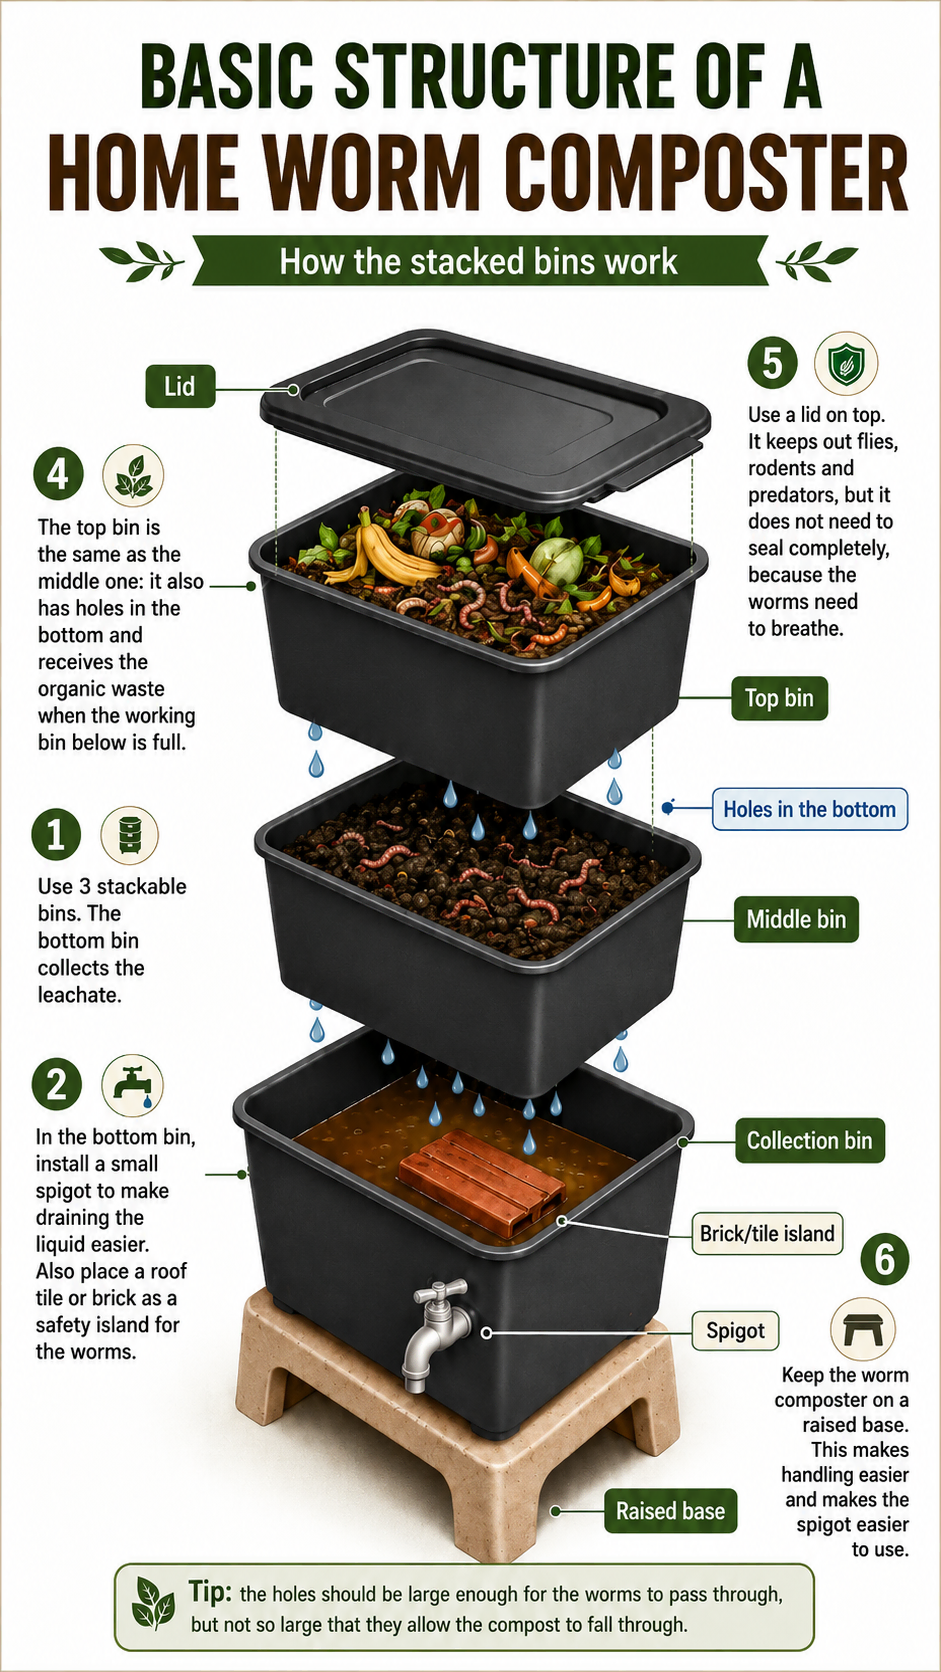
Why three boxes? The logic behind the system
When I set up a worm farm for someone, I always make sure to explain the function of each box before moving on to the drill. Understanding the system’s logic is what separates a functional worm farm from a smelly one.
- Bottom box (biofertilizer collector): does not receive organic matter. Its sole function is to collect the dark liquid that drips from the boxes above. This fluid is the cheapest and most powerful biofertilizer you can offer to your plants.
- Middle box (active breeding): This is where the party happens. The worms live here, eat here, reproduce here. The bottom is perforated to drain excess moisture to the box below.
- Upper box (transition): comes into play when the middle one is full. You start feeding only in the top box, and the worms naturally migrate upwards in search of fresh food, leaving the humus ready in the middle box for you to harvest without even needing to separate each little worm.
This natural migration is, in my opinion, the most brilliant part of the three-box system. It solves the biggest problem for those who compost: how to remove the compost without harming the worms.
What You Will Need to Set Up
- 3 plastic boxes identical, stackable, and opaque (between 5.3 and 16 gallons (20 and 60 liters), as preferred by the family, or even large industrial margarine or mayonnaise containers holding 33 pounds (15 kilograms))
- 1 lid that fits the top box
- Drill, soldering iron, or a large heated nail
- A small plastic spigot from a water jug (optional, but very helpful)
- An old brick, tile, or large stone for the ‘island’ in the bottom box
- 500 g (about 1.1 pounds) of red Californian worms (Eisenia foetida) – which you can purchase on Mercado Livre
- A bag of dry leaves (collect them from the nearest park, it’s easy on a fall morning). If not available, you can use straw or hay.
- A handful of garden soil — no need for fancy potting mix
- Old newspapers or cardboard for the initial bedding
- A sturdy support to raise the structure off the ground (crate, stacked bricks, wooden legs, or even a counter)
An important note: please avoid transparent boxes. I know it’s tempting to peek, but worms detest light and will flee from what seems like open sky to them. A transparent box is only suitable for educational worm composting systems (such as those in schools), and even then, it requires the sides to be covered.

Step-by-step: setting up your home worm composting system
Step 1: Prepare the bottom (collector) box
This is the simplest part. You do not need to drill holes in the bottom. It will merely contain liquid. Place a brick or large stone inside—this will be the “rescue island” for any adventurous worm that falls in. Believe me, it will happen. If you want to go the extra mile, install a small plastic faucet (like those from water jugs) at the front, as low as possible, to drain the biofertilizer without having to dismantle everything.
Step 2: Drill holes in the middle and top boxes
Make holes 4 to 6 mm (0.16 to 0.24 inches) in diameter at the bottom of the two boxes that will hold organic matter. I usually make about 30 to 40 spaced holes in a mesh pattern—it depends on the size of your box, but it needs to be enough to drain liquid and allow worms to migrate between the boxes, yet small enough to prevent humus from falling through.
Some people also drill holes at the upper sides, at the edge, for extra ventilation. This is not mandatory, but in hot climates, it can help keep the system more ventilated. Here in the south, I avoid these holes as I am concerned about invaders entering the box, such as ants, for instance.
Step 3: Assemble the structure
Set up the collector box supported on a stand (it’s important to elevate it off the ground!). Stack the middle box on top of it. For now, set the third box aside—it will only come into play in a few months.
Step 4: Prepare the initial bedding
Line the bottom of the middle box with a generous layer of dry leaves, shredded newspaper, or torn cardboard—about 2 inches (5 cm) thick. This bedding is the initial home for the worms, helping to regulate moisture and maintain a stable microclimate. Moisten lightly, like a wrung-out sponge (damp, never soaked).
Step 5: Introduce the worms and soil
Spread a handful of garden soil over the leaf bedding—this soil is extremely important because it carries the microorganisms, such as beneficial bacteria, fungi, and mites, which will work in partnership with the worms. Without this initial inoculation, the system takes much longer to “kick off”. Gently place your red worms on this soil. They will burrow on their own, fleeing the light.
Step 6: Provide the first feast
Wait about 2 or 3 days to begin feeding. This adaptation period is critical for the worms to acclimate. When you start, make a small pile of organic scraps in one corner of the box—do not spread across the entire box. And never, under any circumstances, throw food on top of the worms or mix it with the soil. Let them find the food.
Step 7: Cover everything with dry leaves
On top of the food pile, add another layer of dry leaves, straw, or shredded cardboard. This covering prevents drying out, masks odors, and stops flies from feasting on your worm farm. Finally, fit the lid (without sealing it, just resting it on top \’97 worms need to breathe).
Daily Care of Your Worm Composting Bin
Where to Place It
The worm composting bin prefers shade, gentle ventilation, and mild temperatures \’97 ideally between 59°F (15°C) and 82°F (28°C). Direct sunlight can kill worms in a few hours. Laundry rooms, covered balconies, shaded backyards, and even in the garage work well. In the extreme cold of winter, it is worth moving closer to an interior wall; in the scorching summer heat, pay extra attention to humidity to prevent them from drying out.
How to Feed
Feed in small piles, alternating corners of the box. I usually do a’ rotation’ of four points: on Monday I feed the left corner, next the right, then the bottom, and so on. This prevents accumulation at a single point, distributes the workload of the worms, and speeds up colonization. Do not feed every day! At the beginning, excess can be fatal. Your system is just starting, and the worms are not yet at their full recycling capacity. Take it slow.
Chop leftovers into smaller pieces whenever possible. A whole banana peel takes weeks to disappear; cut into 0.8 inch (2 cm) pieces, it goes in just a few days. Please do not make a mush for the worms. Avoid blending the residues in a blender.
Moisture Control
This is the point that most often challenges beginners. The ‘squeeze-the-leaf’ rule works well: grab a handful of the content, squeeze it in your hand.
If it drips water, it is too moist. If it crumbles and looks like powder, it is too dry. It should lightly crumble while retaining shape—like well-watered potting mix.
- Too moist? Add dry leaves, shredded cardboard, or light wood shavings (without varnish or paint). Keep the lid slightly open overnight.
- Too dry? Spray water with a spray bottle. Do not pour a full cup directly, or you will drown the entire colony.
When to Drain the Biofertilizer
At first, little liquid comes out. As the system gets going, it may produce a lot—drain every 1 or 2 weeks. Do not let it accumulate to the point of submerging the island, or the worms that fall there will drown. Use the biofertilizer diluted in water (1 part to 10 parts water) for watering plants—undiluted, it is too strong and can burn the roots. It can also be used to make seedlings (it is a powerful root stimulator), and in foliar feeding.
How to Know if the Compost is Ready (and when to add the third box)
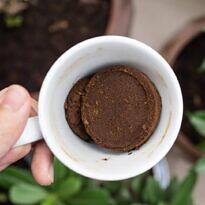
The ready compost has the appearance of coffee grounds, a pleasant earthy smell, and does not stick to your fingers when you press it in your hand. There’s no mistaking it: the original material (peels, stems, cardboard) has disappeared, and in its place, there is that dark, fluffy, slightly moist ‘dirt’.
When the middle box is almost full and the content at the bottom already looks like ready compost, it is time to bring the third box into play:
- Stack the third box on top of the middle one (with holes in the bottom, remember?).
- Set up a new bed of dry leaves inside it and start feeding only in this top box.
- In 2 to 4 weeks, most of the worms will have migrated upwards, chasing the fresh food.
- Remove the middle box (now with few worms) and harvest the compost. Return the few remaining worms back into the system.
- This harvested box then becomes the ‘top box’ in the next cycle. The system is rotational and never stops.
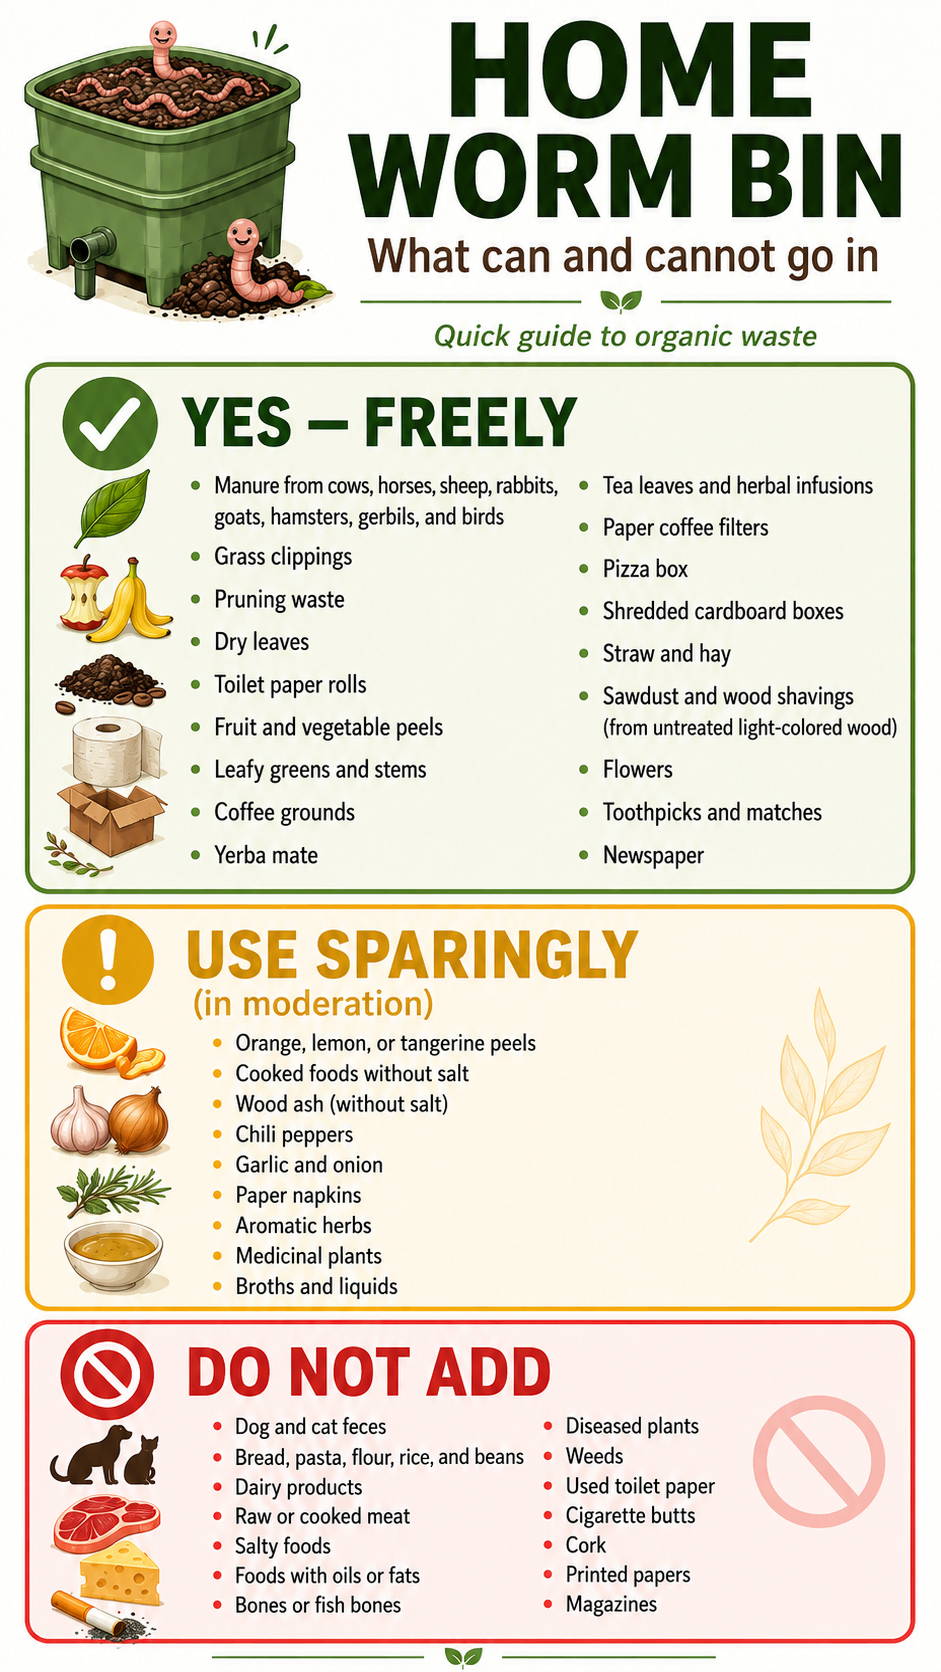
What to Offer (and What Not to Offer) to Your Worms
Here it is, in my opinion, the key factor that separates a thriving wormery from a smelly drama. Worms have very clear preferences.
- Vegetables, stalks, and green leaves
- Coffee grounds (they love it and it also balances the pH)
- Tea and infusion residues, sachets included (without the staple)
- Yerba mate pulp and leaves
- Aged manure from cows, horses, sheep, goats, rabbits, hamsters, gerbils, and birds
- Grass clippings (better dry — fresh clippings heat up too much)
- Dry leaves and chopped pruning debris
- Wilted flowers and flower heads
- Chopped cardboard, clean pizza boxes, toilet paper rolls, used coffee filters, chemical-free paper napkins
- Chopped newspaper (black and white)
- Sawdust and shavings from light untreated woods without varnish or treatment
- Straw and hay
- Used toothpicks and matchsticks
Use sparingly (in small amounts and well distributed)
- Citrus peels (orange, lemon, mandarin, tangerine) — they acidify the system and drive worms away
- Cooked foods without salt or oil
- Breads, pastas, flours, rice, and beans (attract fungi if excessive)
- Wood ash, provided it’s salt-free (not from the barbecue)
- Pepper (irritates the worms)
- Garlic and onion (strong smell lingers)
- Aromatic herbs and medicinal plants (basil, rosemary, mint) — in small quantities
- Used toilet paper (Yuck!)
- Cigarette butts (one or two, rarely)
- Chopped cork
- Common printed papers and magazine leaves (be careful with the ink — prefer cardboard and newspaper)
Never add (it will spoil the system)
- Dog and cat feces (besides the bad smell, they carry parasites dangerous to humans)
- Dairy products in general (milk, cheese, yogurt) — they spoil quickly and attract rats
- Raw or cooked meats, fish, deli products
- Bones and fishbones
- Any food with salt
- Foods with oil, fat, butter, or margarine
- Diseased plants (fungi and bacteria can contaminate the humus)
- Weeds with seeds
- Broths and liquids in large quantities (they can waterlog the system)
Regarding eggshells: they are harmless, but worms cannot handle them whole. I recommend washing, drying, and grinding them in a blender to make eggshell flour.
Here, it is quickly incorporated and also provides calcium to the system.
Common Mistakes I’ve Made (So You Don’t Have To)
1. Placing too much food on top of the worms
A classic beginner’s error. The worms need to search for the food. When you dump a pile of food on them, it suffocates the colony, leads to anaerobic fermentation (that awful sour smell) and can even kill some of them.
2. Skipping the layer of dry leaf cover
This cover is your best friend. Without it, tiny flies appear, the smell intensifies, and the moisture fluctuates wildly. Always maintain about 0.8 to 1.2 inches (2 to 3 cm) of dry leaves or shredded cardboard on top of everything.
3. Overloading it with tangerine peels thinking it’s beneficial
Citrus fruits seem worm-friendly, but in large amounts, they can acidify the potting mix and the worms migrate to escape the discomfort. The same is true for the pH of tomatoes—if you consume a lot of tomato sauce, balance it with plenty of cardboard and dry leaves.
4. Forgetting to drain the biofertilizer
The collection box gets full, the liquid rises, reaches the isle, reaches the middle box, and saturates everything. An anaerobic state forms, smelling like a pigsty, worms flee. Drain at least weekly.
5. Using common garden earthworms
The common earthworm (Lumbricus terrestris and relatives) performs a different type of work—it burrows deeply into the soil, not consuming decaying organic matter with the same voracity. The right choice is the red wiggler (Eisenia foetida), which lives on the surface and specializes in devouring decaying material.
6. Allowing direct sunlight exposure
The sun heats up the box, kills the worms, and dries everything out. Shade is non-negotiable.
Do not chop the food
The smaller the pieces, the faster the worms process them. An entire watermelon rind is a challenge; a watermelon rind cut into about 1.2-inch (3 cm) pieces turns into humus very quickly.

Frequently Asked Questions About Homemade Worm Bins
Will it smell up the house?
No. A well-managed worm bin smells like moist forest soil—pleasant, mild. If it stinks, it’s a sign that something is wrong: excess fresh food, lack of cover, or anaerobiosis. Stop feeding for a week, add plenty of dry material, and aerate it. Prefer to place the worm bin in areas of the house that can be isolated and left with a window open, such as the balcony, laundry room, garage.
What about the flies? Will they take over?
Fruit flies (Drosophila) are a beginner’s nightmare. They appear when there is exposed fruit without cover. Always keep a layer of dry leaves over the food, and the problem disappears. If there are already flies, let the system “dry out” a bit and enhance the cover.
Can I have a worm bin in an apartment?
Yes, you can. I know people who keep it under the kitchen sink, in the corner of the balcony, or in the utility area. Well-managed, it has no odor, does not attract pests, and occupies the space of a laundry basket.
Can I travel and leave the worm bin unattended?
Safely, for up to 3 or 4 weeks. Before traveling, feed normally, add a generous layer of cover, and drain the biofertilizer. Earthworms live off what is already decomposing in the bin.
How long until I harvest the first humus?
Between 3 and 6 months, depending on the size of the colony, the temperature, and the amount of food. The warmer (within the ideal range) and the more finely chopped the food, the faster. In the cold winter of the south it takes longer, but in the summer it is very quick.
What should I do if the earthworms multiply too much?
A good problem to have! The more earthworms, the more food scraps we can recycle in less time. Donate some to friends who want to set up their own vermicompost system, use the surplus directly in garden beds, or sell them. But do not place them in pots. Under ideal conditions, the colony doubles in size every 2 or 3 months.
Can I use the humus for any plant?
In most cases, yes — vegetables, fruit trees, ornamentals, lawns. But avoid using it in plants that require an extremely draining and airy substrate, such as succulents, cacti, desert roses, anthuriums, orchids, and carnivorous plants. The humus retains moisture and tends to compact over time, making the substrate sticky and less breathable, which does not please these types of plants. If you are going to use it in pots, only add a small amount (as fertilizer, not as part of the substrate) and remember to replace the substrate annually.
Let’s get to work (literally)
I know it seems like a lot of information, but I assure you that setting up a vermicompost system takes less time than deciding what to watch on Netflix. Assemble the three bins, make the holes, order the worms, and give the kickstart. In a week you will understand the rhythm of the system; in three months, you will be harvesting your first biofertilizer; in half a year, the ready humus. You’ll feel like a true urban farmer!
So, when someone asks you why your plants are so vibrant, you will be able to answer, with that somewhat proud smile of someone who discovered a secret, that it all started with a banana peel and three plastic boxes.