A moss ball hanging near a window catches every visitor’s eye. There’s a reason for that: kokedama turns an ordinary starter plant into a living arrangement without needing a pot. It may look delicate, but it stays surprisingly secure when the soil mix has enough binding power and watering is done the right way.
For a first attempt at how to make a kokedama, I like to recommend pothos. It handles small care mistakes, bounces back quickly, and lets its vines drape softly around the ball. The secret isn’t having a magic touch—it’s preparing the soil mixture well, covering all the soil with moss, and never relying on a spray bottle alone.
What is kokedama, and where does the technique come from?
Kokedama is a Japanese word made up of koke, meaning moss, and dama, meaning ball. The literal translation is “moss ball.” The technique originated in Japan during the Edo period in the 17th century as a popular form of Nearai, a bonsai style grown without a pot on a shallow tray.
In Nearai, the roots are exposed and intertwined with moss. Kokedama adapted that idea into a compact sphere of growing medium. The roots stay inside a mass of clay-rich soil and organic matter, protected by moss and string.
The ball replaces the pot, but it doesn’t replace plant care. It needs to hold moisture without becoming waterlogged, allow air to reach the roots, and stay firm during soaking.
Best plants for how to make a kokedama
Choose plants with resilient roots that tolerate partial shade or indirect light and do well with limited root space. Small starter plants usually make assembly easier and keep the ball in proportion.
- Pothos, Epipremnum aureum: tough, tolerant of short dry spells in the moss ball, and a great choice for beginners.
- Mini fern or Boston fern, Nephrolepis exaltata ‘Marisa’: has arching fronds and appreciates the moisture held by sphagnum moss.
- Philodendron ‘Brasil’, Philodendron hederaceum var. oxycardium ‘Brasil’: grows well in moderate indirect light and likes a fibrous potting mix.
- Watermelon peperomia, Peperomia argyreia: has compact roots that work well in smaller moss balls.
- Bird’s nest snake plant, Dracaena trifasciata ‘Hahnii’: tolerates the ball drying more deeply between waterings.
- Dwarf anthurium, Anthurium andraeanum: its thick roots make good use of the aeration provided by pine bark and sphagnum.
- Mistletoe cactus, Rhipsalis baccifera: an epiphytic species, meaning it grows supported on other plants without taking nutrients from them. It has low water needs and works well suspended.
If you’re just getting started, I recommend pothos or bird’s nest snake plant. If you want more trailing volume, the mini fern and Philodendron ‘Brasil’ are beautiful choices, but they need closer attention to moisture.
Materials and tools needed for assembly
Gather everything before removing the plant from its pot. That way, the roots won’t sit exposed while you search for string, moss, or water.
- Sharp pruning scissors.
- Medium plastic basin or bowl.
- Spray bottle filled with water.
- Latex or nitrile gloves.
- Dried sphagnum moss or preserved green floral moss.
- Clear nylon fishing line, 0.25 mm to 0.35 mm, for a discreet finish.
- Jute twine, natural raffia, or cotton string, if you want a more rustic look.
- Rich screened garden soil or topsoil.
- Powdered red clay or sterilized clay soil.
- Fine composted pine bark or carbonized rice hulls.
- Fine coconut coir or chopped sphagnum moss.
- Chlorine-free water.
Nylon line won’t break down with moisture. Jute, raffia, and cotton look more natural, but they wear out with repeated watering and may need to be retied within four to twelve months.
The kokedama soil mix formula

Plain potting soil won’t hold a kokedama together for long. Once it comes into contact with water, it can start to fall apart. Clay is what gives the ball its structure; sphagnum moss or coconut coir helps retain moisture; and pine bark or rice hulls create small air pockets so oxygen can reach the roots.
- 2 parts black soil or rich, sifted garden soil.
- 1 part powdered red clay or sterilized clay-rich soil.
- 1 part chopped sphagnum moss or fine coconut coir.
- 1/2 part finely composted pine bark or carbonized rice hulls.
Add chlorine-free water a little at a time, mixing with gloved hands. The right texture is similar to modeling clay: when you squeeze it, it should hold its shape without crumbling or dripping water through your fingers.
Step by step: how to make a kokedama at home
Step 1: Prepare and clean the root ball
Carefully remove the plant from its plastic nursery pot. Hold the root ball—the mass of soil around the roots—and never pull by the stem. Using your fingertips, loosen and remove about 30% to 50% of the old soil.
Remove depleted potting mix and any dead or dried roots. Keep the healthy roots intact, along with some of the soil still attached to them. Never remove all the soil from a young plant. That kind of complete cleaning can cause osmotic shock, a strong plant reaction to a sudden change in water and salts around the roots.
Don’t force the roots apart or break the main root. If the root ball is very compacted, work slowly with your fingers and loosen it little by little.
Step 2: Hydrate the sphagnum moss
Place the sphagnum moss in a bucket or basin of water for 15 minutes. It needs to absorb water completely before you wrap the ball.
Then squeeze the moss with your hands until it stops dripping. It should stay damp, but not waterlogged. Oversaturated moss makes tying harder and leaves the mixture too wet.
Step 3: Shape the clay-based substrate ball
Mix the potting soil, clay, chopped sphagnum moss or coconut coir, and the pine bark or rice hulls. Add water gradually until the mixture reaches a modeling-clay consistency.
Shape a ball sized to fit the roots. In general, a sphere about 3 to 6 in (8 to 15 cm) across works well for small plants. Make a deep cavity in the top with your thumb, or divide the mixture into two halves.
Enjoyed this guide? There's more where it came from.
Understanding why plants behave the way they do is what turns guesswork into a thriving garden. That's exactly what we share in the Shrubz newsletter — free, straight to your inbox:
- Seasonal care reminders timed to your gardening calendar
- Propagation and pruning techniques, explained step by step
- Pest and disease alerts — catch problems before they spread
Place the roots inside the cavity and close the ball around them. Press firmly enough to hold the mixture together, but not so hard that you crush the roots. Don’t leave hollow spaces inside. These air pockets can dry out the feeder roots, the fine roots that absorb water and nutrients.
Step 4: Apply the outer moss layer
Spread a sheet of hydrated sphagnum moss on a flat surface, or cover the ball with smaller tufts. Press the moss against the entire soil ball.
Check the sphere from every angle. The moss layer needs to cover 100% of the surface, with no gaps. Even a small opening is enough for the clay to show through and start leaking out during soaking.
If the moss looks thin in any spot, add more before you start wrapping the string. It’s easy to fix now; after tying, it becomes much more difficult.
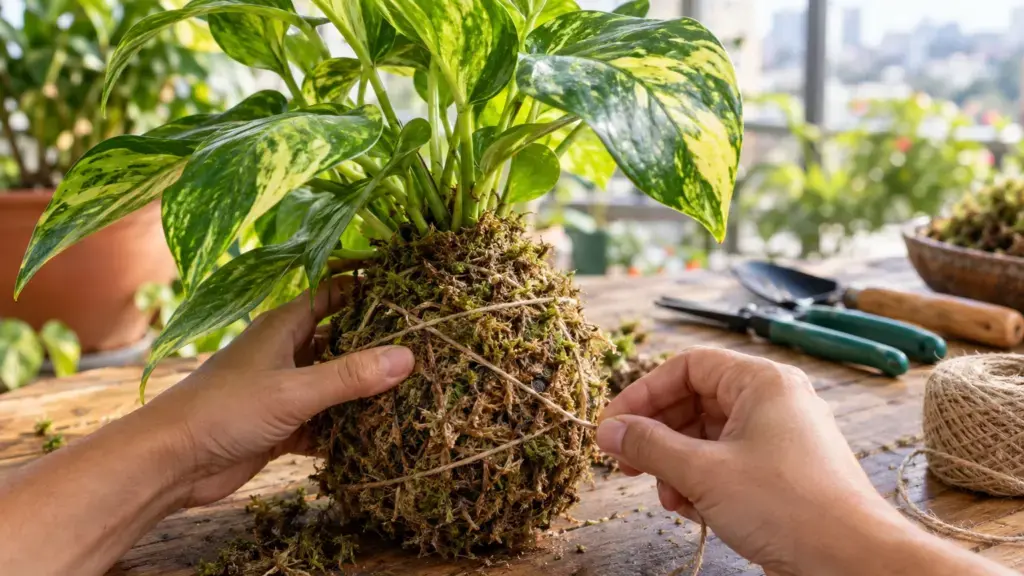
Step 5: Tie and finish the moss ball

Secure the end of the string near the base of the stem, without tightening it around the plant. The string should hold the moss in place, never constrict the stem.
Wrap in several directions: first vertically, then diagonally, and finally horizontally. Changing direction distributes pressure and gives the kokedama a firmer structure. Make 25 to 40 wraps, depending on the size of the ball.
When you touch the kokedama, the moss should stay firmly in place. Tie a double knot in the wrapped string itself and trim the excess with scissors. If you plan to hang it, leave a sturdy loop of nylon line or whatever cord you chose.
How to care for a kokedama so it lasts
How to water using the soaking method

Misting the moss is helpful for freshening the surface, but it does not water the roots. This is one of the most common mistakes I see when people learn how to make a kokedama: the moss looks damp on the outside while the center of the ball is dry, and the plant starts to decline.
To water it, submerge the entire ball in a bowl of room-temperature water. Keep only the plant crown—the area where the stem meets the roots—above the water.
Keep the ball submerged for 5 to 10 minutes, or until the bubbles stop rising. Those bubbles mean water is moving into the small air spaces in the potting mix.
Remove the kokedama and let it rest on a rack or in a sink drain for 15 to 20 minutes. It needs to stop dripping before going back to its spot. Never leave it sitting in a saucer full of water: roots without oxygen rot, and the base of the stem can also be damaged.
Light and the ideal environment
Keep the kokedama in bright indirect light or light partial shade. A bright window without harsh direct sun during the hottest part of the day usually works well.
Full sun can scorch the moss and dry out the ball within a few hours. Scorched leaves and crispy moss are signs the plant is getting too much direct light.
Safe fertilizing for moss ball arrangements
A controlled-release fertilizer, such as a balanced 14-14-14 NPK, is the safest option. Add 3 to 5 granules to the center of the mix during assembly, or push the granules into the ball with a wooden skewer every six months.
You can also use a foliar fertilizer for foliage plants, diluted to half the manufacturer’s recommended strength. Mist the leaves every two weeks, or add it to the soak water once a month during spring and summer.
Avoid castor bean meal, bone meal, fresh manure, and other fermentable organic fertilizers. In an indoor moss ball, they can create strong odors, encourage fungi that feed on decomposing matter, and cause the moss to rot.
Preventing and treating pests and fungal issues
When a white fungal layer appears on the moss, the usual cause is excess moisture combined with poor air circulation. Move the kokedama, wipe the surface with a damp cloth, and improve airflow around it.
For mealybugs or aphids on the leaves, remove the insects with a cotton swab dipped in isopropyl alcohol. Another option is to spray a mild solution of gentle soap late in the day.
If mealybugs or spider mites keep coming back, use a ready-to-use insecticide or miticide labeled for home gardening. Apply it away from direct sun and follow the label directions.
The golden rule for getting watering right
Do not follow a fixed watering schedule. A kokedama tells you when it needs water by its weight, and that test is more reliable than judging only by the outer moss.
Pick up the ball in the palm of your hand. When it feels as light as a foam ball or a small apple, it is time to soak it. If it still has the dense weight of a wet stone, wait—even if the tips of the moss look dry.
In hot weather, watering is often needed every 4 to 6 days. In cool or rainy periods, it may go 8 to 12 days. The weight of the ball is a better guide than the day of the week.
Common mistakes when learning how to make a kokedama and grow it well
- Watering only with a spray bottle: the water stays on the surface and never reaches the root zone. Soak it instead.
- Using only regular potting soil: without clay, the ball falls apart the first time you water by immersion.
- Keeping the kokedama in a dish of water: lack of oxygen around the roots encourages rot.
- Tying the string too tightly around the stem: the binding can interrupt the plant’s internal flow, cause tissue death, and weaken or snap the stem.
- Leaving gaps in the moss: the clay mix stays exposed, loses material, and slowly comes apart.
Frequently asked questions
How long does an indoor kokedama last?
Its longevity depends on the plant species you choose and how you care for it. A well-made kokedama, with proper light, soak watering, and careful fertilizing, can keep the plant in good condition for a long time.
Watch the roots, the weight of the ball, the leaf color, and the firmness of the moss to decide when to adjust your care routine.
Can I make a kokedama using only regular potting soil?
I don’t recommend it. Potting soil alone doesn’t have the binding strength needed to keep the ball firm when it’s soaked in water. Use clay to give it structure, sphagnum moss or coconut coir to hold moisture, and pine bark or carbonized rice hulls to keep air around the roots.
What should I do if the outer moss starts to mold or turn white?
Wipe away the white layer with a damp cloth and move the kokedama to a spot with better air circulation. Check your watering routine: the ball should be hydrated and then allowed to drain, never left dripping or sitting in water.
How to Make a Kokedama That Grows With You

Learning how to make a kokedama is a hands-on process that takes observation and patience. Your first one may turn out less round than you expected, and that’s completely fine. With practice, you’ll learn to recognize the right texture in the soil mix, the proper tension in the wrapping, and the ideal weight before watering.
Start with a tough young plant, pay close attention to the clay-based mix, and take your time with the first soak. When the ball stays firm and the plant responds with healthy leaves, your kokedama starts to reflect the care you’ve put into it.