If you’ve ever dreamed of having a vegetable garden but always thought it was complicated or too time-consuming, microgreens can completely transform how you think about growing food at home. Imagine harvesting your own fresh, nutritious, and flavorful microgreens in just seven days, right in your kitchen, without needing a yard or any sophisticated equipment.
Microgreens are edible plants harvested at a very young stage, shortly after the first true leaves appear. Unlike sprouts (which grow only in water) and fully mature plants, microgreens occupy a perfect middle ground: their roots are anchored in a potting mix, they already have developed leaves, and their flavor can be up to 40 times more intense than the mature version.
The crucial difference between Microgreens, Sprouts, and Baby Leaf greens
This confusion is more common than you might think, and understanding the difference is essential for food safety:
- Sprouts: Grown in water, harvested at 2–3 days, eaten whole (root, seed, and all). Higher risk of bacterial contamination.
- Microgreens: Grown in a sterile potting mix, harvested at 7–14 days, and only the leaves and stems are consumed. Much safer and more flavorful.
- Baby leaf greens: The next stage, harvested at 3–4 weeks, when the plants are already more developed.
Microgreens offer the best of both worlds: the speed of growing sprouts with the safety and flavor of leafy vegetables.

Why grow microgreens at home? Freshness, intense flavor, and convenience
The main reason is the unbeatable freshness. While a head of lettuce at the grocery store may have been harvested days ago (losing nutrients by the hour), your microgreens go from tray to plate in seconds. On top of that, you have complete control: no pesticides, no additives, just you and nature working together.
As one home grower recently commented in an online gardening forum: “I started with microgreens out of curiosity, and now I can’t eat salad without them.”
“The flavor is so much more intense it feels like I’d been eating soggy cardboard before!”
Nutritional Power: Why Are Microgreens Considered “Superfoods”?
Science has been confirming what many gardeners already noticed in practice: microgreens are true nutritional powerhouses. A study published in the Journal of Agricultural and Food Chemistry, one of the most respected scientific journals in the field, revealed impressive data about these tiny giants.
Nutrient density: From 4 to 40 times more nutrients than the mature plant
Yes, you read that correctly. Microgreens can contain up to 40 times more vitamins and antioxidants than their mature counterparts. This happens because, at this early growth stage, the plant concentrates its energy and nutrients to ensure survival and rapid development.
To put it into perspective: one tablespoon of red cabbage microgreens can provide as much vitamin C as a full cup of chopped mature cabbage. It is like having a natural supplement growing right in your kitchen.
Health benefits: Concentrated vitamins C, E and beta-carotene
Research highlights the main nutrients found in abundance in microgreens:
- Vitamin C: Essential for the immune system; some microgreens, such as cilantro and radish, can even surpass citrus fruit.
- Vitamin E: A powerful antioxidant, especially concentrated in sunflower microgreens.
- Beta-carotene: A precursor of vitamin A, abundant in red and purple microgreens.
- Vitamin K: Important for blood clotting, found in high levels in green, leafy microgreens.
And the best part: you can get all of this in just about a week of growing time, using less space than a shoebox.

Materials You Need: What it takes to get started today
The good news is that growing microgreens does not require a major investment. With a modest budget, you can set up your first complete growing tray. Let’s look at the practical details.
Specialty seeds: Why you should avoid pesticide-treated seeds
This is the most critical safety point. Never use bulk field seeds intended for large-scale commercial crops.
They usually come treated with fungicides (you can tell by the artificial pink or green color), which are toxic for direct consumption.
Where to find them:
- Seed lines specifically labeled for sprouts or microgreens seeds in major garden centers and home improvement stores
- Certified organic vegetable seed lines from reputable brands
- Small, untreated seed packs (often labeled “untreated” or “no chemical treatment”)
- Specialized online retailers that sell “Seeds for Microgreens” or “Certified Organic Seeds”
Always check the package: it must explicitly state “no pesticide treatment,” “untreated seed,” or “certified organic.”

High‑Performance Potting Mix: Professional blends, Coconut Coir, and the importance of sterility
Forget backyard soil. For microgreens, we need a lightweight, sterile potting mix with a fine texture. Sterility is essential because it eliminates pathogens that thrive in humid environments.
Tested and approved options:
- Professional seed‑starting mix: Commercial, nursery‑grade potting mix with excellent drainage and free of pests.
- General‑purpose soilless potting mix: A more affordable alternative, good for beginners when sifted to remove larger chunks.
- Coconut coir (fine grade): Sustainable, holds moisture without waterlogging, must be hydrated before use.
- Seed‑starting substrate: Specifically blended for germination, commonly found in garden centers and farm supply stores.
Avoid mixes with hard clods, coarse pine bark, or regular garden topsoil — they compact too much and make it difficult for the delicate roots of microgreens to develop.
Trays and Containers: From professional kits to repurposed delivery packaging
The ideal depth is 0.75 to 1.5 inches (2 to 4 cm). Trays that are too deep waste potting mix; trays that are too shallow dry out too quickly.
Creative and functional solutions:
- Professional seedling trays (found in agricultural supply and garden stores)
- Plastic takeout or meal‑prep containers (wash thoroughly, punch drainage holes in the bottom)
- Foam grocery trays used for meat and produce (sanitize with diluted bleach)
- Disposable aluminum baking tins (work well for trials and small batches)
A valuable tip from experienced growers: always keep trays in pairs. Use one for planting and another upside down as a “lid” during the blackout phase for your microgreens.
Essential tools: pressure sprayers and precision shears
The sprayer is non-negotiable. Watering with a pitcher or cup simply does not work – you will unearth the seeds and create puddles that favor fungi. Look for:
- Simple trigger sprayer: The cheapest version (about $3–$5), perfectly functional for beginners.
- Pressure sprayer: Invest in this once you scale up production. The spray is uniform and it saves your hand from fatigue.
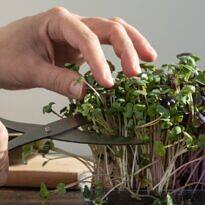
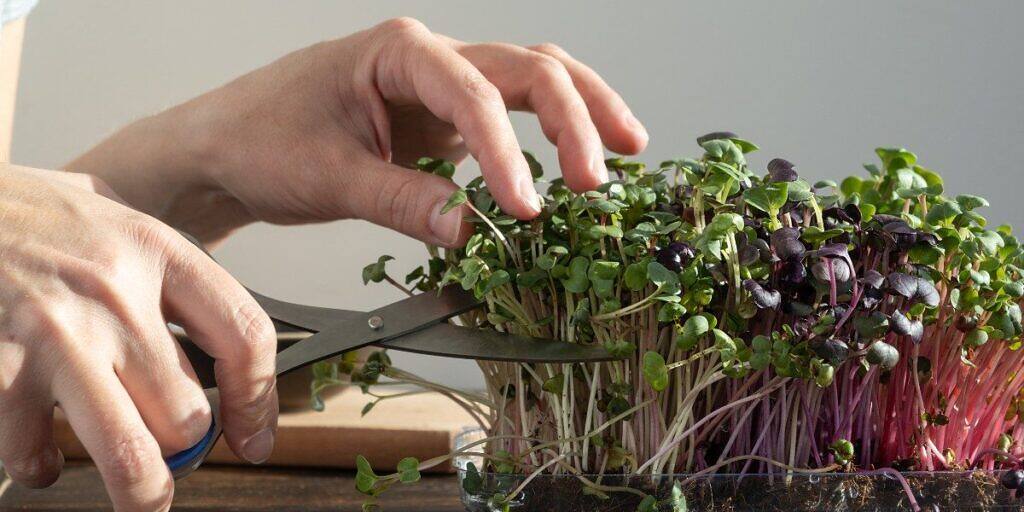
For harvesting microgreens, a sharp kitchen scissors or a small pruning shears works perfectly. Some growers prefer sharp knives to cut in a single motion.
Food safety: What you MUST and MUST NOT grow as microgreens
Not everything that germinates is safe to eat as microgreens. This information can literally protect your health.
Toxicity warning: Why you should never use nightshades (tomato, eggplant and peppers)
The Solanaceae family produces toxic substances called glycoalkaloids in the leaves, stems and green parts. While ripe fruits are safe, the young leaves of microgreens concentrate these toxins.
List of plants that are PROHIBITED as microgreens:
- Tomato (all varieties)
- Eggplant
- Pepper and chili peppers
- Potato
- Beans (raw beans contain toxic lectins – exception: mung bean)
This is one of the reasons microgreens are considered safer than water-grown sprouts: you choose plant species that are proven safe right from the start.
How to identify and prevent contamination by Salmonella and E. coli
Unlike sprouts that grow in standing water (an ideal environment for bacteria), microgreens grow in well-drained potting mix, which drastically reduces the risk. Even so, good practices are essential:
- Always wash your hands before handling seeds or microgreen trays
- Use drinking-quality water for irrigation (never untreated well or cistern water)
- Sanitize reusable trays with a bleach solution (1 tablespoon per 1 quart (1 liter) of water)
- Discard any tray with a bad odor or signs of rot
- Whenever possible, harvest and consume your microgreens on the same day
Studies from horticultural research institutions confirm that, when grown correctly, microgreens present much lower microbiological risks than conventional supermarket produce.
Step by Step: The 7-Day Method for a Perfect Harvest
Now let’s get to what really matters: the tested and proven microgreens method that delivers success even for those who have never grown anything before.
Day 1: Preparation, dense sowing, and the “Golden Tip” of adding weight over the seeds
Start by moistening the potting mix in the tray. It should feel like a well-wrung sponge—wet, but not so saturated that water drips out when you squeeze it. Spread the microgreens seeds densely, creating an even “carpet.” The right density is: the seeds should be close together, almost touching, but not overlapping.
Mist lightly with water and here comes the secret: place a second tray on top, gently pressing the seeds against the potting mix. Then place a moderate weight on this top tray (a book, for example).
Why does this work? The pressure mimics natural conditions of seeds buried in soil, activating growth hormones and forcing the roots to anchor much more firmly. The result is stronger, more uniform microgreens.
Days 1 to 3: The Blackout Phase – Driving growth and root anchoring
Keep the trays covered (either with another inverted tray or a dark cloth) for 2 to 3 days. Check moisture daily, misting lightly if needed—the potting mix should never dry out completely, but it also shouldn’t form puddles.
In this blackout phase, the microgreens make an intense effort to find light, stretching their stems and strengthening their structure. This is called controlled etiolation. You’ll see white or yellowish shoots emerging—this is completely normal and exactly what you want.
As one experienced grower reports in online forums: “A lot of people get scared when they see white microgreens during the blackout phase and think something went wrong. Relax! That’s exactly how it should look. The green magic happens when you give them light.”
Days 4 to 7: The Light Phase – Activating photosynthesis and flavor
On the fourth day, remove the cover and place the tray in a bright location. Ideally, give your microgreens strong indirect light—near a bright window, but without direct sun that can scorch the delicate leaves.
The transformation is almost magical: within a few hours, chlorophyll starts to form, the microgreens turn that deep vibrant green, and their characteristic flavors begin to develop. Keep misting once a day, always in the morning (watering at night encourages fungal problems).
For growers in darker homes or apartments: A simple, inexpensive solution is cool-white LED lighting (around 6500K), widely available in home improvement and lighting stores. Position the LED strip or fixture about 6 to 12 inches (15 to 30 cm) above the trays and keep it on for 12 to 16 hours a day. It works surprisingly well for healthy, flavorful microgreens growth!
Day 7: How to harvest microgreens correctly to maximize shelf life
The ideal time to harvest microgreens is when the cotyledons (first leaves) are fully open and the first true leaves are just starting to appear. For most species, this happens between the 7th and 10th day.
Use a sharp pair of scissors or a knife, cutting close to the potting mix (substrate) with steady, firm movements. Avoid pulling the plants out by hand – this brings potting mix along with the roots and makes cleaning more difficult. Harvest only what you plan to eat that day, because cut microgreens keep for a maximum of 3–4 days in the refrigerator when stored in an airtight container with a paper towel.
Gently shake the harvested microgreens to remove any seed hulls or debris, but do not wash them in advance – washing speeds up spoilage. If you prefer to wash them, do so only immediately before eating.
Troubleshooting Guide: Common mistakes with microgreens and how to avoid them
Even when you follow all the steps, some challenges can still arise. Here are solutions for the most frequent microgreens problems.

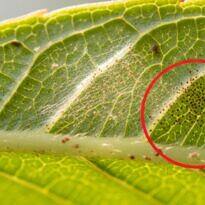
White mold vs. root hairs on microgreens: Don’t throw away a perfectly good tray!
This is by far the most common misunderstanding among beginners growing microgreens. You look at the tray and see a white “fuzz” at the base of the stems. Panic! Mold, right? Usually not – it is probably just root hairs.
How to tell the difference:
- Root hairs: Very fine, organized structures growing from the base of the stem and roots. They have no smell. They disappear or collapse when you mist with water. They are a healthy part of the microgreens root system.
- True mold: Looks like disorganized spiderwebs that spread through the potting mix. It has a characteristic sour or rotten odor. It does not disappear when sprayed with water.
As one experienced grower explained: “I lost three trays of radish microgreens before I realized those ‘white hairs’ were just normal roots. Real mold is easy to recognize by smell – it truly stinks.”
The danger of overwatering microgreens and how to prevent damping-off
Damping-off is a fungal disease that literally causes seedlings and microgreens to “fall over,” making them wilt and collapse at the base. It is triggered by excess moisture and poor air circulation.
Effective prevention:
- Golden rule: keep the potting mix moist, never waterlogged
- Mist only when the surface starts to lighten in color (a sign it’s drying)
- If puddles form, drain by tilting the tray
- Use a high-quality sterile potting mix – cutting corners here becomes expensive later
If you identify damping-off in any section of the tray, immediately remove all affected microgreens with a spoon, discard the contaminated potting mix, and increase ventilation.
Ventilation: The secret to avoiding bad odors and mold
Microgreens need air circulation. In enclosed or very humid spaces (such as kitchens with limited windows), a small tabletop fan works wonders. It doesn’t need to blow directly on the trays – simply moving the air in the room already reduces mold problems dramatically.
If your kitchen tends to be very humid, consider growing microgreens in a drier room during the growing phase, bringing them into the kitchen only at harvest time.
Extra Tips for Apartment Dwellers
Growing in low‑light spaces: Using 6500K LED strip lights
LED strip lights are a game‑changer for anyone growing microgreens in apartments or homes with few windows. A color temperature of 6500K (cool white/daylight) is ideal for photosynthesis.
Basic setup:
- About 3 feet (1 meter) of 6500K LED strip light (enough for 2–3 trays)
- Power supply (usually included with the strip)
- Simple plug‑in timer (to automate a 12‑hours‑on / 12‑hours‑off cycle)
Overall cost is modest, and the return in microgreens production usually pays off within the first week.

Radish microgreens: Why this is the best variety for your first try
If you are going to grow just one type of microgreens to start, choose radish microgreens. This is not just a personal preference – there are strong practical reasons:
- They germinate quickly and very uniformly (almost 100% of the seeds sprout)
- They tolerate minor watering mistakes
- Bold, peppery flavor that works in countless recipes
- Large seeds that are easy to handle
- Grow well even with limited light
- Seed packs are generally inexpensive
After radish microgreens, try arugula (mildly peppery), mustard (spicy), and sunflower (crisp texture and mild flavor).
Frequently Asked Questions (FAQ)
Can I reuse the potting mix after harvesting the microgreens?
Reusing potting mix for a new microgreens crop is not recommended. The potting mix becomes packed with tangled roots and may harbor pathogens. However, you can repurpose it as organic fertilizer: add it to a container with ornamental plants or mix it into your compost. The roots will decompose and enrich the soil.
Do I need to use fertilizers or chemical plant food?
No. This is one of the major advantages of microgreens. Because microgreens are harvested so early, the plant relies only on the nutrients stored in the seed itself. A good-quality potting mix provides support and moisture. Fertilizers are unnecessary for microgreens and can even negatively affect their flavor.
Where can I buy reliable seeds for microgreens?
In addition to well-known vegetable seed brands, you can look for microgreens seeds at:
- Online stores that specialize in urban gardening and kitchen gardens
- Health food stores and natural products markets (many sell organic seeds in bulk)
- Garden centers and agricultural supply stores (look for untreated seeds labeled as suitable for consumption)
- Local gardening clubs and community gardening groups (members often share or resell seeds)
Always ask whether the seeds are free from chemical treatment before purchasing.
Do microgreens grow back after the first cut?
Unfortunately, they do not. Unlike some herbs that regrow after cutting, microgreens are harvested before the plant develops that ability. After cutting, discard the potting mix with the roots and start a new tray of microgreens. For this reason, it is a good idea to stagger your sowings: start a new tray every 2–3 days to enjoy a continuous harvest of microgreens.
What is the best way to eat and store microgreens?
Always eat microgreens raw to preserve heat-sensitive vitamins and enzymes. Ways to use microgreens include:
- Finishing hot dishes (add your microgreens after turning off the heat)
- In sandwiches and wraps
- On top of chilled soups (gazpacho, vichyssoise)
- As a garnish for dishes (they look beautiful on the plate)
- In green juices and smoothies
To store microgreens, place them in an airtight container lined with a paper towel on the bottom (to absorb excess moisture) and keep them in the refrigerator. Properly stored, microgreens last about 3–4 days. Never store microgreens cut and wet—this is a sure way to turn them into green mush within 24 hours.

A healthier kitchen in just one week
Microgreens are not a passing trend or something reserved for celebrity chefs – they are an accessible revolution in how we think about healthy eating. In just seven days, with minimal investment and a growing area no larger than a book, you can harvest microgreens with a nutrient density that rivals or surpasses most supplements on the market.
Starting an indoor microgreens garden is less about perfect gardening and more about reconnecting with the natural life cycle of food. It is about showing children where their food really comes from, having full control over what ends up on your plate, and enjoying the unmistakable satisfaction of harvesting something you grew yourself.
Begin today. One small tray of radish seeds, a basic potting mix (substrate), and a spray bottle are all you need to start growing microgreens at home. In seven days, you will be cutting your first crop of microgreens and understanding why so many people across English-speaking countries are turning their kitchens into compact urban microgreens farms.
So, what will your first microgreens seeds be? Radish for ease, arugula for flavor, or basil for versatility?