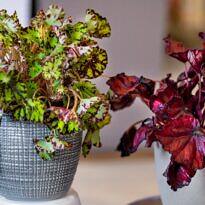
Even the most experienced orchid enthusiasts often come across ailing orchids that have fallen victim to pests like scale insects or slugs or have been infected by fungi and bacteria, leaving them with few healthy roots and leaves, preventing them from thriving. These orchids are often doomed unless given special care. However, with the use of the ICU technique, their chances of survival can be greatly enhanced, with a recovery rate of up to 70%. This means that out of every 10 ailing orchids placed in recovery, 7 will fully recuperate and start growing and blooming again.
Which plants should you apply this to? This technique is suitable for various orchid species. The criteria for placement in the orchid ICU are:
- Softened and lackluster leaves and pseudobulbs, or;
- Leaves with fungal or bacterial spots;
- Severely compromised roots with significant or near-total loss.
Orchids that possess a good proportion of healthy leaves and roots should not be placed in the orchid ICU, as they can be treated without losing their natural resilience.

Similarly, orchids with viral diseases are not candidates for the orchid ICU. Since these diseases are systemic, incurable, and transmissible, attempting to recover such an orchid is not advisable, as it will remain a source of disease for the entire orchid collection and the environment. Keep in mind that viral diseases are silent, and even if the plant seems to have recovered, it’s likely incubating the disease, which can take over 20 years to manifest.
Orchid Preparation:
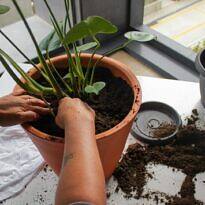
1. After a thorough evaluation, clean the orchid by removing all substrate attached to the roots and any debris on the leaves. Some diligent orchid enthusiasts use a soft toothbrush, water, and soap for cleaning.
2. Following the cleaning, pruning is essential. Trimming aims to eliminate the diseased parts of the plant, halting the disease’s progression and allowing the orchid a chance to recover.
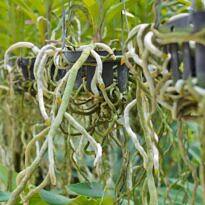
3. Rotted roots must be completely removed. The main criterion here is texture. If the velamen is brittle and detaching from the roots, it can be entirely trimmed. Where the root is firm, and turgid, regardless of color, there may be life, and this root should remain on the plant. Thus, even if the color is brown or has black spots, the root may still be healthy and have recovery potential, as long as it’s firmly attached.
4. Trim dead or spotted sections from rhizomes, leaves, and pseudobulbs as well. Strive to preserve the maximum number of leaves on the plant, as these organs facilitate energy production for recovery through photosynthesis. Cut away a spot with a safety margin, but do not remove leaves merely because they are wilted. Wilted leaves are simply dehydrated and should be retained.
5. Spray the plant’s roots with a soluble Calcium solution, such as Forth Equilibrium, at a ratio of 6 ml per 1 liter of water. Calcium will balance root pH, nourish the plant with this element, and enhance the absorption of other nutrients.
6. If necessary, apply fungicide to the ailing plant, but exercise caution. Remember that biocides can be toxic both to the orchid and humans, but particularly to mycorrhizae living in the velamen, crucial for root balance and growth. Apply cinnamon powder to all cuts. Cinnamon is a natural healing agent, fungicide, and bactericide. Set aside.
ICU Preparation:

We’ll need a “room” where your orchid can receive the ideal amount of heat, humidity, and light for recovery. Additionally, this special environment will shield them from future contamination, pests, and opportunistic diseases.
1. Cut a transparent PET bottle in half. It can be a soda bottle or even a 5-liter water jug, depending on the size of the orchid you’re aiming to recover.
2. Thoroughly wash the bottle inside and out.
3. After cutting, rejoining the two halves of the bottle might prove challenging. To facilitate this fit, we’ll soften the edges of the bottom part of the bottle near the stove flame. Turn on the stove at low heat and rotate the bottle about 20 cm away from the flames. Be cautious not to get too close; the bottle might lose its shape. As soon as the edges become rounded, it’s ready. Test the fit and keep the bottle closed to prevent contamination.
4. For the rim to fold, rotate it around the stove’s flame about 20 cm away from the fire. Being too close will cause excessive wrinkling, making it hard to fit the plant.
5. Keep rotating constantly for a uniform rim; after slightly folding the edges, simply fit the top part.
Prepare the Bed:

The bed where your orchid will rest is composed of sterilized sphagnum moss. This will help maintain humidity both within the ICU environment and around the roots. The sphagnum moss will also provide stability so that the orchid doesn’t move freely within the bottle.
- Purchase natural dehydrated sphagnum moss, the kind with a pinkish-cream hue. You can find it in florist shops and garden centers. Avoid using colorful mosses intended for decorations.
- Place the moss in a pot and add water until it’s about two fingers above the moss, ensuring even immersion. After boiling, let it sit for 5 minutes, then turn off the heat.
- Once the moss has cooled down, remove it from the pot and squeeze out all the water.
- Add 5 ml of a rooting fertilizer, such as Forth Root, to a liter of boiled water. This fertilizer contains essential nutrients and seaweed that promote root growth.
- Place the previously sterilized and squeezed moss into this rooting solution, letting it soak for a few minutes.
Placement:
- Squeeze the moss until it’s slightly damp and place a handful at the bottom of the prepared transparent bottle. Avoid compressing or pressing the moss at the bottom; it should remain airy. Water should not accumulate at the bottle’s bottom.
- Gently position your plant on the moss bed, ensuring it’s stable and supported without being loose. The roots should touch the moss.
- Seal the bottle by fitting the top part and securely taping it with wide, transparent adhesive tape. The bottle should be airtight to prevent moisture from escaping. Don’t forget to put the cap on.
- Place your orchid in a well-lit, protected, and ventilated area. Direct heat or strong sunlight will harm the plant. In the shade, fungi may develop and prevent photosynthesis.
Monitoring:

Without opening the bottle, observe your orchid weekly to track progress. Phalaenopsis orchids tend to recover quickly, and new roots may start growing within about 15 days. On the other hand, Cattleyas might take a bit longer, and signs of improvement might appear after around 60 days.
At the first sign of fungi growing inside the bottle, immediately open it and repeat the entire process with a new bottle and fresh sterilized moss.
Once your orchid develops roots that are at least 5 centimeters or longer, you can transplant it into a suitable orchid substrate and provide regular fertilization.
However, it’s crucial to gradually acclimate the orchid. The environment inside the bottle significantly differs from the outdoors. There’s more light and less humidity. Therefore, over at least 4 weeks, gradually accustom it to higher light levels day by day; otherwise, it could get scorched and regress.