Backyard hydroponic garden: how it works in practice
Setting up a backyard hydroponic garden is an efficient way to grow lettuce, arugula, kale and fresh herbs in a small area, with major water savings and precise control over the growing environment. Instead of soil, the roots grow in water enriched with nutrients or in an inert growing medium, receiving exactly what they need to develop.
Before you start buying pipes, pumps and hoses, it is worth understanding the different types of hydroponic systems, what each one requires in terms of maintenance, and which options are best suited to a typical backyard. That is what we will organize here, step by step.

Why set up a backyard hydroponic garden
A hydroponic garden makes it possible to grow high-quality leafy greens in relatively small spaces, such as backyards, patios and balconies. With a well-designed hydroponic system, you can save up to about 90% of the water used in traditional in-ground gardening, thanks to the constant recirculation and reuse of the nutrient solution.
For hobby growers or families growing for home use, some benefits of a backyard hydroponic garden stand out:
- Ergonomics: the growing benches are raised, avoiding the constant bending and kneeling required for ground-level beds.
- Fewer soil-borne pests: the absence of soil greatly reduces problems with nematodes and weeds.
- Faster crop cycles: leafy crops like lettuce can be harvested several days sooner than in soil, under well-managed conditions.
- Efficient water use: the nutrient solution circulates in a closed or semi-closed hydroponic system, reducing losses through infiltration.
For a home backyard, this means producing more in less space, with less continuous physical effort and a bit more technical attention. For those who enjoy working with plants and do not mind using a meter or a small electric pump, this trade-off in a backyard hydroponic garden is usually well worth it.
Basic concepts to understand a backyard hydroponic garden
Hydroponics is simply the cultivation of plants without soil, with the roots exposed to a solution rich in essential nutrients such as nitrogen, phosphorus, potassium, calcium, magnesium and others. These elements are dissolved in water, in proportions adjusted for each type of crop grown in the hydroponic system.
From a practical hydroponics standpoint, three concepts are crucial:
- Nutrient solution: this is the plants’ “food,” prepared with fertilizers specifically formulated for hydroponics.
- Root oxygenation: if roots remain only in still water, without access to oxygen, they rot quickly. Each hydroponic system solves this in a different way.
- pH and electrical conductivity (EC) control: pH affects nutrient uptake, and EC indicates the concentration of nutrients in the water. At home, the best approach is to follow the recommended ranges and guidelines provided by the manufacturer of the hydroponic fertilizer and use simple meters.
With these three pillars of hydroponics in mind, it becomes easier to understand why some systems require pumps and others do not, and why monitoring the nutrient solution is so important.
Choosing the ideal hydroponic system for your backyard
There are several types of hydroponic systems, but for a backyard setup and for getting started with hydroponics, four stand out:
Kratky: the simplest system, with no electricity required
The Kratky method is the most minimalist hydroponic system: you use a reservoir filled with nutrient solution, covered with a board (or lid) that holds the cups with the seedlings. The roots grow downward, reach the solution, and gradually, as the plant consumes water and nutrients, the level drops, creating an air gap between the lid and the solution. This air zone is what allows root oxygenation.
Main advantages:
- No need for pumps or electricity.
- Very low initial cost.
- Reduced maintenance during the growing cycle (ideally, you set it up, plant, and then mostly just monitor).
Key limitations:
- In very hot weather, oxygenation may be insufficient, favoring root diseases.
- Works best on a small scale, with a limited number of pots or containers.
- Requires extra care to prevent the reservoir from overheating and to reduce algae growth.
In a backyard hydroponics setup, the Kratky method works well for a few heads of lettuce, arugula, and herbs in boxes or buckets, especially in spots that stay cooler and partially shaded during the hottest hours of the day.
DWC or raft system: roots in water with active oxygenation
In DWC (Deep Water Culture), also called a raft system, plants sit in a foam board or other support that floats on top of the nutrient solution. The roots stay constantly submerged, and oxygenation is provided by air pumps similar to those used in aquariums.
Strengths:
- Good thermal stability of the nutrient solution, thanks to the larger water volume.
- Excellent performance for leafy greens when properly oxygenated.
- Relatively simple setup (container, floating raft, air pump and air stones).
Care and risks:
- Dependence on electricity to maintain oxygenation.
- Risk of rapid crop loss if the air pump fails for many hours.
- Need for careful hygiene of the reservoir to prevent biofilm buildup and root diseases.
For backyards, the DWC hydroponic system is a good intermediate option, especially if you want a relatively compact lettuce bench with one or a few larger reservoirs.

NFT: channels with a nutrient film, ideal for leafy greens
NFT (Nutrient Film Technique) is one of the most popular hydroponic systems commercially for lettuce and other leafy greens. The nutrient solution is pumped to the highest point of the channels (usually pipes), then flows down as a thin “film” of water along the bottom, comes into contact with the roots, and returns to a lower reservoir to be recirculated.
Main advantages:
- Excellent performance with lettuce and leafy greens in general.
- Very efficient use of water and nutrients, thanks to constant recirculation.
- Allows tightly spaced rows on raised benches.
Challenges and risks:
- Greater dependence on electricity: a prolonged pump shutdown can cause rapid wilting.
- Need for a gentle and correct slope in the channels for proper flow.
- Risk of clogs at inlets and outlets, requiring regular maintenance and cleaning.
For those who want to take backyard hydroponics seriously, the NFT hydroponic system is usually a very solid choice for leafy greens. It requires more planning during setup, but offers good productivity with manageable maintenance.
Drip irrigation in media: versatile, but more labor-intensive
In a drip irrigation hydroponic system using inert media, each plant grows in a pot or grow bag filled with an inert potting mix (such as perlite, coconut coir, or blends). The nutrient solution is applied through drippers at set intervals (or times) and in controlled volumes, and the excess drains away and may or may not be returned to a reservoir.
Advantages:
- Very versatile for growing larger crops, such as tomatoes, bell peppers and other fruiting plants.
- Roots are well anchored in the potting mix, which is ideal for heavy plants.
- Less sensitive to brief power outages, depending on how the hydroponic garden is managed.
Disadvantages for home use:
- More moving parts and more potential clogging points (drippers, thin hoses).
- Greater need for fine-tuning and regular cleaning.
- More demanding day-to-day maintenance.
For a backyard hydroponic garden focused on lettuce and leafy greens, drip irrigation in potting mix is usually more complex than necessary. It becomes interesting if, later on, the goal is to move up to tomatoes, bell peppers and other fruiting vegetables.
What to consider when choosing your system
When deciding how to set up a hydroponic garden in the backyard, a few practical criteria help you avoid mistakes:
- Available space: small backyards benefit from compact NFT benches or DWC totes; very limited areas can start with Kratky buckets.
- Budget: Kratky is the most affordable option; NFT and DWC fall into the mid-range; drip systems tend to be more expensive because of the number of components.
- Level of dedication: if you want something you can “set up and maintain with minimal effort,” Kratky and some simple DWC layouts make more sense. NFT and drip systems require a stricter inspection routine.
- Power reliability: if there is a risk of frequent power outages, systems that depend entirely on a pump need a backup plan (such as a water reserve or a way to drain quickly).
For most people who want to grow leafy greens for their own consumption, a small, well-built NFT hydroponic garden or a neatly organized DWC system already delivers excellent results.
Essential components of a hydroponic garden
Regardless of the hydroponic garden system you choose, some elements are common:
- Reservoir: where the nutrient solution is stored. It can be a water storage tank, drum or bucket, as long as it is made from food-grade material suitable for drinking water or food use. Dark colors help prevent algae growth.
- Structure or benches: support channels, pots or totes.
They can be made of metal, treated wood or masonry, as long as they are stable and level. - Channels or containers: pipes, gutters, grow boxes or pots, depending on the hydroponic system.
- Water pump (NFT, drip): recirculates the nutrient solution.
- Air pump and air stones (DWC): provide aeration for the nutrient solution.
- Seedling cubes or plugs: phenolic foam, rockwool or other materials specifically designed for starting seedlings in hydroponics.
- Inert growing medium (drip): such as perlite, treated coco coir, expanded clay pellets, depending on the design of the hydroponic system.
- Measuring instruments: a pH meter and electrical conductivity (EC) meter help you know when to adjust and replenish nutrients.
Additional components such as hoses, fittings, valves and timers are added as the hydroponic system becomes more automated.
Nutrient solution, pH and conductivity: the heart of the hydroponic garden
The nutrient solution is prepared from fertilizers specifically formulated for hydroponics, usually supplied in two or more parts to avoid unwanted reactions in the water. Each manufacturer provides instructions on dosage, dilution and the recommended ranges for pH and electrical conductivity.
Some practical points:
- Use clean water, preferably with low salinity.
- Follow the ratios indicated by the manufacturer of the hydroponic fertilizer for the type of crop (leafy greens, herbs, fruiting plants, etc.).
- Adjust the pH with appropriate solutions (pH up or pH down), avoiding makeshift corrections with products not intended for this purpose.
- Monitor electrical conductivity regularly and top up water and nutrients as plants consume the solution and it evaporates.
In everyday practice, many people establish a routine of checking the hydroponic system on specific days of the week, recording measurements in a notebook or simple spreadsheet. This helps reveal trends, such as a constant drop in conductivity or recurring pH imbalances.
Light, temperature and placement in the yard
Leafy vegetables in hydroponics are still “normal” plants: they need light, adequate temperature and good airflow.
For setting up your backyard hydroponic garden, keep in mind:
- Sun exposure: most leafy greens need plenty of light. In very hot climates, partial shade or light shading during the hottest hours can prevent heat stress.
- Nutrient solution temperature: reservoirs exposed to intense sun tend to overheat, damaging the roots. It is worth placing them in a shaded area or protecting them with a simple structure, roofing panel, or reflective paint.
- Ventilation: spots with very still air favor diseases, while strong winds can break plants and dry out the leaves excessively.
A good starting point is to observe your yard throughout the day and identify where the morning sun (usually softer) hits and where the afternoon sun is strongest. Adjusting the hydroponic garden to this pattern usually makes a big difference in the plants’ thermal comfort.
Basic step-by-step guide to setting up a small NFT or DWC system
Although there are many variations, a general roadmap helps organize the stages when deciding how to set up a hydroponic garden in your backyard:
- Define the space and capacity Choose the location considering sun exposure, access to water, and drainage. Decide how many plants you want per cycle (for example, 20, 40, or 60 heads of lettuce) and size the grow racks and reservoirs accordingly.
- Choose the system For leafy crops, NFT and DWC are practical options. In NFT, plan on 2 to 4 lines of pipe on a simple rack; in DWC, one or two larger totes or tanks with a floating board.
- Build the physical structure Install sturdy benches or supports, with a slight slope in the case of NFT. Secure the channels or tanks, leaving enough space to walk around for daily care and harvest. Make sure everything can bear the weight of the water and fully grown plants.
- Install reservoir and pumps Place the reservoir in a spot protected from direct sun. Connect the water pump (NFT) or air pump (DWC), with tubing and air stones or diffusers. Test the system for a few days using only water to adjust flow, return lines, and prevent leaks.
- Ensure electrical safety Use proper outlets, preferably with ground-fault protection (GFCI), and shield all connections from splashes and rain. Avoid makeshift extension cords running across wet floors. If needed, consult a licensed electrician to evaluate the setup.
- Prepare the nutrient solution Fill the reservoir with clean water, add hydroponic fertilizers following the manufacturer’s instructions, stir thoroughly, and adjust the pH. Measure the electrical conductivity (EC) and correct it if necessary.
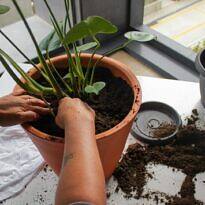
- Producing seedlingsSeedlings for a hydroponic garden can be started in trays with plugs specifically designed for hydroponics, keeping them in a protected environment until they have well-developed roots and a few true leaves. Avoid transplanting very young or weak seedlings.
- Transplanting and starting the cropPlace the plugs or cups with seedlings into the openings of the channels (NFT) or onto the floating raft (DWC). Make sure the roots are already reaching the nutrient solution or are well positioned to do so within a few days.
Only then should you connect the hydroponic garden system to the plants.
Transplanting seedlings and routine management
During transplanting in a hydroponic garden, the main point is to avoid damaging the roots too much and to prevent sudden shock. In systems with moving nutrient solution (NFT, DWC), seedlings adapt better when the solution is already stabilized with appropriate pH and electrical conductivity.
Once the hydroponic garden is up and running, daily or near-daily management involves:
- Checking the nutrient solution level in the reservoir and topping up with water when necessary.
- Measuring pH and electrical conductivity according to your routine, adjusting them based on the recommendations of the nutrient product you are using.
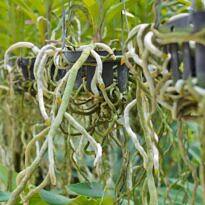
- Observing the color and firmness of the roots (white or slightly cream-colored roots are healthy; dark, slimy roots with a bad smell indicate problems).
- Monitoring the leaves for signs of nutrient deficiencies, leaf burn, or diseases.
- Cleaning filters and water inlets and outlets to prevent clogging.
Personally, I like to reserve a fixed time, for example in the late afternoon, to do this quick check of the hydroponic garden. In 10 to 20 minutes a day, many problems can be prevented before they become serious.
Common problems, risks, and limitations of a hydroponic garden
Not everything is perfect when growing in a hydroponic garden. Some issues are typical in small home hydroponic systems:
- Algae: they appear when light hits the nutrient solution directly or when clear channels are used. The solution is to darken reservoirs, use opaque tubing, and reduce light entry.
- Clogging: in NFT and drip systems, small solids, roots, or biofilms can block outlets and emitters. Filters and regular cleaning are essential.
- Lack of oxygenation: in DWC and even in poorly sized Kratky setups, roots may suffer from lack of air. Properly sized air pumps and solutions that are not overcrowded with plants help prevent this.
- Root diseases: fungi and bacteria that attack roots find favorable conditions in nutrient solution that is too warm, low in oxygen, and rich in organic matter.
- Electrical failures: power outages or short circuits can stop pumps or create shock hazards.
Well-designed installations and quality equipment are the best insurance.
Another key point is understanding that hydroponics is not a “set it and forget it” way to grow. It replaces part of the physical work of an in-ground garden with more technical work monitoring water and electricity. For those who enjoy observing and learning, this is actually part of the fun; for those who want truly zero maintenance, it can be frustrating.
Leafy greens, herbs, fruits and roots: what is most viable
Home hydroponic gardens work especially well for:
- Lettuce in different types (butterhead, looseleaf, romaine, etc.).
- Arugula, spinach and other compact leafy greens.
- Herbs such as basil, parsley, chives, cilantro and mint (respecting each one’s specific needs for light and spacing).
Thus, focusing on leafy greens is usually the easiest path when getting started with a hydroponic garden. These plants grow quickly, take up relatively little space, and adapt well to systems such as NFT, DWC and, to a lesser extent, Kratky.
When it comes to fruiting vegetables (tomato, bell pepper, cucumber, strawberry) and root crops (carrot, beet, radish), things change a bit:
- Fruiting crops: they require higher nutrient inputs at certain stages, stronger anchoring for the plants and, in many cases, systems such as drip irrigation in potting mix, which are more technically advanced.
- Root crops: they need space to develop and very careful management of oxygenation and moisture, which makes hydroponic gardening feasible, but less straightforward, compared with leafy greens.
This does not mean it is impossible to grow tomatoes or strawberries in a backyard hydroponic garden, but that the system design and day-to-day management become more demanding. For beginners, it usually makes more sense to master leafy greens and herbs first, and only then move on to more demanding crops, if there is interest.
Practical summary for getting your hydroponic garden right
Building a backyard hydroponic garden is, essentially, about combining three things: a physical hydroponic system suited to your space and available time, a well-managed nutrient solution, and a basic level of discipline in your monitoring routine.
In practical terms, the safest approach is usually to:
- Start small, focusing on leafy greens and a few herbs.
- Choose a simple and well‑understood system (a compact NFT setup, a well‑organized DWC system, or a small‑scale Kratky system).
- Use fertilizers specifically formulated for hydroponics, following the directions exactly.
- Ensure good oxygenation of the roots and protect the system from excessive heat.
- Install pumps and electrical connections safely, avoiding temporary or improvised fixes.
With this solid hydroponics foundation in place, your backyard or patio becomes not only a source of fresh food, but also a living laboratory where you can observe, test, and fine‑tune your system. From there, expanding your hydroponic garden or trying new crops becomes a natural next step—and far easier than trying to do everything at once in the beginning.