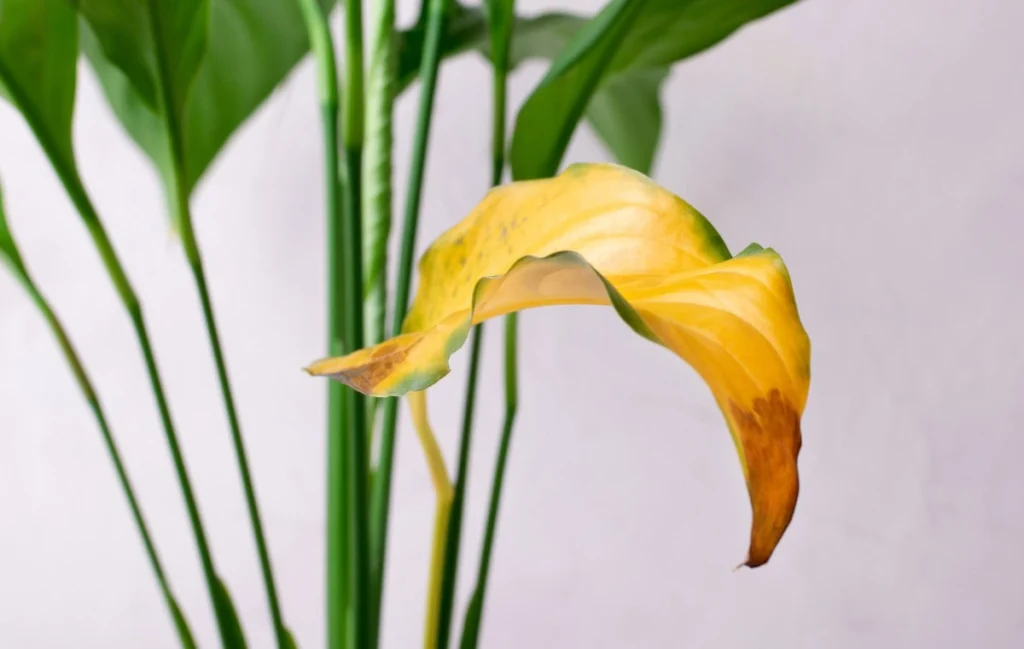
Is your beloved peace lily turning yellow?

Recently, I received this very question from our reader Márcia, and I realized how common this doubt is. I myself have had this problem with my peace lilies.
Question: I have a pot with a peace lily that, after a long time, started to show yellowing of both new and older leaves. I could not see any presence of pests, but I became worried. I removed the yellow leaves and sprayed Bordeaux mixture. So far, no more yellow leaves have appeared. I need guidance. Thank you – Marcia
This plant is known for being very hardy and easy to grow. But that doesn’t mean it can’t have some problems. Let’s find out the cause of this yellowing so your plant can recover as quickly as possible!
Causes of Yellowing Leaves in Peace Lilies
Before you panic, you need to understand that one or two yellow leaves on your plant can be entirely normal. Plant leaves do not last forever, and when leaves get old, it is normal for the plant to want to take advantage of the nutrients contained in them, gradually yellowing the old leaf before discarding it. But if many leaves appear yellow at the same time, we must consider that something serious is happening with your peace lily, as we will see. There are several reasons why peace lily leaves may turn yellow, such as:
1. Overwatering
Overwatering is one of the most common causes of yellowing leaves in peace lilies (Spathiphyllum spp.). Although it is a plant that enjoys moist soil, it does not tolerate waterlogged roots, which can lead to a series of problems, including root rot and the inability to absorb essential nutrients. Let’s explore this issue in more detail.
How Overwatering Affects the Peace Lily
When the peace lily is overwatered, the soil around the roots remains constantly wet, leaving the root environment saturated with water. This prevents them from breathing properly, as the constant presence of water reduces the amount of air and consequently oxygen available in the soil. Without oxygen, the roots start to die, which in turn prevents the plant from effectively absorbing water and nutrients.
Signs of Overwatering:
- Yellow and Wilted Leaves: Leaves affected by overwatering usually turn yellow, starting at the tips and edges, eventually becoming soft and drooping.
- Moldy or Rotting Smell: Constantly waterlogged soil can develop an unpleasant moldy or rotting smell, indicating the presence of rotting roots.
- Slow Growth: The plant’s growth can be visibly slower or completely stagnant.
- Waterlogged Soil: The constant presence of water in the pot saucer is a clear sign of overwatering.

Solutions for Overwatering
To correct the overwatering problem in peace lilies, some actions need to be taken:
- Reduce Frequency: Water the peace lily only when the top layer of the soil is dry to the touch, generally 2-3 cm (1 inch) deep.
- Stick Method: Insert a wooden stick or pencil into the soil. If it comes out dry, it’s time to water. If it comes out moist, wait a few more days.
- Water Deeply and Evenly: When watering, ensure that the entire potting soil is evenly moistened. After watering, let the excess water drain completely.
- Avoid Water Accumulation: Never leave stagnant water in the pot saucer. Discard the accumulated water a few minutes after watering.
2. Poor Drainage in the Pot
Poor drainage is one of the most common problems that can affect peace lilies (Spathiphyllum). When the pot does not have adequate drainage, water can accumulate in the soil, causing a series of problems that result in leaf yellowing. Let’s explore how to identify this problem, understand its causes, and apply effective solutions to ensure your peace lily’s health.
Signs of Poor Drainage
A plant with drainage problems usually shows clear symptoms:
- Water Accumulated at the Bottom of the Pot: After watering, observe if the water remains in the pot saucer for a long time. The water should not stay stagnant; it should drain quickly.
- Constantly Waterlogged Soil: If the soil is always moist to the touch, even days after watering, it’s a sign of poor drainage.
- Waterlogged Roots: When you remove the plant from the pot, the roots may appear swollen or softened, indicating they are waterlogged and not breathing properly.
- Yellow and Soft Leaves: This is one of the first visible signs. The leaves start to turn yellow, especially those closest to the base of the plant.
Causes of Poor Drainage
Poor drainage can be caused by several factors, including:
- Lack of Drainage Holes in the Pot: Many decorative pots do not have drainage holes or have insufficient or small holes, preventing water from draining properly.
- Using Saucers Under Pots: Saucers can retain the water that drains from the pot, causing a “pool” effect that keeps the soil waterlogged.
- Clogged Drainage Holes: Over time, roots or sediments can block the drainage holes, preventing water from draining.
Solutions to Improve Drainage
To resolve drainage problems and prevent leaf yellowing in your peace lily, check the following:

- Drainage Holes: Ensure the pot has several drainage holes at the bottom. If necessary, increase the number or size of the holes to improve drainage.
- Pot Size: Use a pot that is appropriate for the size of the plant. Very large pots can retain more water than necessary.
- Drainage Material: Add a layer of drainage material at the bottom of the pot, such as small stones, gravel, or expanded clay. This helps create a space where water can accumulate without saturating the soil.
- Drainage Fabric: Place a layer of drainage fabric (such as landscape fabric) over the drainage material to prevent the soil from obstructing it over time and sedimentation.
- Periodic Checking: Regularly check the drainage holes to ensure they are not clogged by roots or sediments. If the hole is blocked, you can insert a screwdriver, skewer, or another pointed object to restore the drainage capacity of the hole.
- Avoid Excessive Use of Saucers: If using saucers under the pots, ensure they are emptied after watering. Do not leave the plant in continuous contact with accumulated water.
3. Compacted Soil
Compacted soil can be a major problem for peace lilies, significantly affecting their health and appearance. Compacted soil prevents water, air, and nutrients from reaching the plant’s roots adequately. This can lead to yellowing leaves and other signs of stress. Let’s better understand why compacted soil is harmful and how to deal with this problem.
How to Identify Compacted Soil
Identifying if your peace lily’s soil is compacted can be relatively simple. Here are some signs and symptoms that indicate compacted soil:
- Difficulty Penetrating: When trying to insert a finger or a wooden stick into the soil, you encounter resistance, indicating that the soil is hard and compact.
- Surface Water: Water tends to stay on the surface of the soil for a long time before being absorbed or runs off the sides of the pot, leaving the center dry.
- Stunted Growth: The plant shows slow and stunted growth, with smaller and less vigorous leaves than normal.
- Yellowing Leaves: The leaves start to turn yellow, especially the newer ones, due to the lack of nutrients and oxygen available to the roots.
Causes of Compacted Soil
Soil compaction can occur for several reasons:
- Frequent Watering: Watering the plant too often can lead to soil compaction, especially if the pot does not have good drainage.
- Using Inadequate Soil: Using low-quality soil or soil not suitable for pots can contribute to compaction. Clay soils, for example, are more prone to compaction than sandy soils.
- Lack of Aeration: Lack of periodic loosening of the soil can cause it to compact over time. Root growth can also compact the soil by occupying all available space.
- Delayed Transplanting: Indoor plants should be transplanted into fresh, new soil every one to two years. If it’s been a long time since your plant was transplanted, its soil is probably compacted.
Solutions for Compacted Soil
Solving the compacted soil problem requires some specific interventions. Here are the main measures you can take:
1. Transplant to New Potting Mix
If the compaction is severe, the best solution is to transplant the peace lily to new, more suitable soil. Here’s how to do it:
- Choose Quality Soil: Use an indoor plant potting mix that is light and well-drained. Mixes that contain perlite, vermiculite, or sand, as well as fibers and pieces of organic matter, such as pine-based and coconut-based materials, help improve drainage and prevent compaction. Avoid using regular garden soil or mixes that contain soil.
- Carefully Remove the Plant: Remove the peace lily from the old pot carefully to avoid damaging the roots. If necessary, loosen the soil around the roots before transplanting.
- Transplant to the New Pot: Place the plant in the new pot and fill it with fresh mix, gently tapping the pot and lightly pressing the soil around the plant to firm it in place and eliminate spaces. Water immediately and add more soil if necessary.
2. Improve Existing Soil
If transplanting is not an immediate option, you can try to improve the existing soil:
- Loosen the Soil: Use a gardening fork or a skewer to poke the soil around the plant, loosening it carefully. This will temporarily help increase air circulation and water penetration.
- Add Organic Matter: Mix organic matter such as compost, worm castings, or shredded dry leaves into the top layer of the potting soil. This will improve soil structure and help prevent compaction.
- Apply Mulch: Add pine bark, dry leaves, straw, or coconut chips over the potting soil. Mulch prevents watering from compacting the soil and helps preserve and restore soil aeration over time.
4. Over-fertilization

Fertilization is essential for the healthy growth of the peace lily, providing the necessary nutrients for the development of leaves, flowers, and roots. However, over-fertilization can be harmful, leading to sudden leaf yellowing and the accumulation of mineral salts in the soil, which can burn the roots.
How Over-fertilization Affects the Peace Lily
When there is too much fertilizer, especially quick-release ones with high nitrogen content or those with a high concentration of mineral salts, a phenomenon called “fertilizer toxicity” occurs. Most plants absorb all the nitrogen from the soil, not just the amount they need at the moment, causing them to become intoxicated and burnt. Additionally, excessive fertilizers create a saline environment around the roots, making it difficult for the plant to absorb water, even if the soil is moist. This process is known as “osmotic desiccation,” where the roots lose the ability to absorb water due to the high concentration of salts in the soil.
Signs of Over-fertilization:
- Sudden Yellowing and Leaf Burn: If the problem is excess nitrogen, the plant ends up absorbing more than it needs and becomes intoxicated. It can cause the plant to die if not corrected quickly.
- Burnt Leaf Edges: One of the first signs of over-fertilization is the appearance of yellow or brown edges on the leaves. This occurs because the roots cannot absorb enough water to counterbalance the high concentration of salts.
- Abnormal Growth: The plant may show stunted or deformed growth, with smaller and less vigorous leaves.
- Soil with Salt Buildup: White spots or crusts on the soil surface indicate an accumulation of mineral salts from excess fertilizer.
- Wilting: Even with moist soil, the plant may show signs of wilting due to the inability to absorb water efficiently.
Preventing Over-fertilization:
To avoid the damage caused by over-fertilization, follow these guidelines:
- Correct Dosage: Always follow the manufacturer’s recommendations for the amount and frequency of fertilization. Avoid the temptation to use more fertilizer in the hope of accelerating the plant’s growth. Most of the time, what is lacking are other factors like light, water, or adequate soil for the peace lily to grow well.
- Gradual Fertilization: Instead of fertilizing all at once, divide the recommended amount over the year. This allows for more efficient nutrient absorption and reduces the risk of nitrogen toxicity and salt accumulation.
- Type of Fertilizer: Use slow-release fertilizers, such as osmocote or organo-mineral fertilizers, which provide nutrients gradually and consistently, minimizing the risk of toxicity.
- Leaching the Soil: Periodically, wash the soil with clean water to remove excess accumulated salts. This process, known as leaching, helps maintain a healthy saline balance in the soil. To leach the soil, simply water abundantly, letting it drain well through the bottom of the pot.
What to Do in Case of Over-fertilization?
If you suspect your peace lily is suffering from over-fertilization, follow these steps to remedy the situation:
- Stop Fertilizing: Stop fertilizing the plant immediately to prevent the situation from worsening.
- Leach the Soil: Wash the soil with abundant water to help eliminate accumulated salts. Make sure the water drains completely, removing the excess minerals.
- Transplant if Necessary: If the soil is very saturated with salts, consider transplanting the plant to new soil. Use fresh, well-drained soil to provide a healthier environment for the roots.
- Monitor the Plant: Observe the plant in the following weeks to ensure it is recovering. Adjust the frequency and amount of future fertilization to avoid similar problems.
5. Lack of Fertilization

The lack of fertilization is a common cause of yellowing leaves in the peace lily (Spathiphyllum wallisii). This plant requires balanced nutrition to stay healthy and lush. When nutrients are scarce, the plant shows visible signs of deficiency, with yellowing leaves being one of the most evident.
How to Identify Lack of Fertilization
Nutritional deficiency in peace lilies can be identified by the following signs:
- Progressive Yellowing: The yellowing usually starts with the older leaves, gradually moving to the newer leaves.
- Slow or Stunted Growth: The plant may exhibit reduced or stunted growth, with smaller and less vigorous leaves.
- Pale Leaves: The leaves may appear pale and faded, indicating an overall lack of nutrients.
Essential Nutrients for the Peace Lily
To ensure the health and vigor of the peace lily, it is important to provide balanced nutrition containing the main macronutrients:
- Nitrogen (N): Essential for leaf and stem growth. Nitrogen deficiency results in yellow leaves and stunted growth.
- Phosphorus (P): Crucial for root and flower development. Lack of phosphorus can cause dark leaves with a purple hue and reduced growth.
- Potassium (K): Necessary for the plant’s overall health, aiding in disease resistance and water regulation. Potassium deficiency can result in yellow leaves with brown edges.
How to Fertilize the Peace Lily
Properly fertilizing the peace lily is crucial to prevent nutrient deficiency. Here are some guidelines to ensure effective fertilization:
- Choosing the Fertilizer:
- Use a balanced fertilizer, such as NPK 10-10-10, which contains equal proportions of nitrogen, phosphorus, and potassium.
- Consider using organic fertilizers, such as worm castings, bone meal, and castor cake, which provide nutrients in a more natural and gradual manner.
- Frequency of Fertilization:
- During spring and summer, fertilize every four to six weeks.
- In autumn and winter, reduce the frequency to every eight to twelve weeks, as the plant enters a slower growth period.
- Application Method:
- Follow the manufacturer’s instructions regarding the fertilizer dosage.
- Spread the fertilizer evenly over the soil surface, avoiding direct contact with the roots to prevent burns.
- After application, water the plant well to ensure the nutrients dissolve and distribute evenly throughout the soil.
- Monitoring and Adjustments:
- Regularly observe the plant to identify signs of improvement or the need for adjustments in fertilization.
- If the plant continues to show signs of deficiency, consider conducting a soil analysis to identify which specific nutrients are lacking.
Additional Tips for Maintaining Adequate Nutrition
- Rotation of Fertilizers: Alternate between different types of fertilizers to ensure complete nutrition and avoid the accumulation of a single type of nutrient.
- Foliar Fertilizers: Use foliar fertilizers to provide nutrients directly to the leaves, which can be useful in cases of severe deficiency.
- Composting: Periodically add organic compost to the soil to improve soil structure and long-term fertility.
Ensuring adequate fertilization is essential to keep the peace lily healthy and vibrant. With balanced nutrition, its leaves will remain green and lush, contributing to the plant’s beauty and vitality. Remember to regularly monitor the health of your peace lily and adjust fertilization as needed to avoid nutrient deficiency problems.
Step-by-Step Recovery for Your Peace Lily
- Check Watering: Ensure you are watering adequately, without excess.
- Evaluate Drainage: Make sure the pot has good drainage and use a drainage layer if necessary.
- Evaluate the Soil: If the soil is compacted, transplant the plant to fresh, new substrate.
- Fertilization: Use a balanced fertilizer, avoiding excess, and add organic compost to nourish the plant.
With these tips, your peace lily should recover and once again be a beautiful addition to your green space.