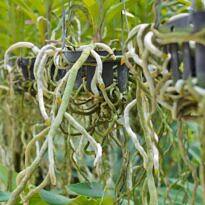
One of the most common issues that affect both beginner and advanced gardeners is the dreaded burnt leaf tips. Leaves that exhibit dried-out edges, curling, and eventually develop a yellowing that progresses to brown and black, signifying lifelessness.
Often, even young leaves emerge with this problem. Unfortunately, plants cannot regenerate damaged and wounded parts like animals can. Nevertheless, they can always produce new leaves, provided they recover from the initial cause that led to the burns.
In this article, I aim to assist you in identifying the potential reasons behind your plants’ leaf burn. It’s important to note that causes are often not as obvious as they seem, and in many cases, multiple factors can be involved, negatively impacting the plant. So, don’t dismiss one possibility when you’re certain of another.
Despite being unable to regenerate lost parts, we can do a lot to eliminate these causes and promote new healthy growth in our plants, restoring their beauty.
Let’s dive in!
1. Salinity:
The first and one of the most significant causes of burnt leaves is salinity. It can come in various forms, as we’ll see below. Salt, whether in the air, substrate, or water, disrupts the plant’s osmotic balance and sap diffusion. Water absorption and transpiration are reduced, causing the plant to accumulate salts within its cells. It’s akin to giving our plants seawater to drink. Instead of hydrating the plants, we’re dehydrating them. One of the initial symptoms is precisely the burning of leaf tips and edges.
a. Seaside Effects: Those living in coastal regions face a double challenge. Salt reaches them through the air, carried by maritime winds, and also through rain laden with ocean salt. A wide range of plants isn’t bothered by this salinity. This is why we see beautiful plants all along the coastline. However, an even larger portion of plants will suffer from the excess salt from the sea, and there’s nothing we can do about it. The best approach is to refrain from tormenting the plants and instead choose species that are known to be resistant to our gardens. Observing the neighborhood and even neighboring beaches will offer valuable clues about what to plant in a coastal garden. You might find some suggestions in the article: Coastal Landscaping.
b. Excessive Fertilization: This is undoubtedly one of the most common causes. We often fertilize our plants carelessly, inadvertently increasing salinity in both the pot and substrate. Be cautious with the application of chemical fertilizers, especially those rich in nitrogen. Common fertilizers, like NPK types, are saline and contain impurities that are also salty. If you suspect excessive fertilization might be causing burnt leaf tips in your plants, switch to organic fertilizers, high-quality soluble fertilizers (such as Peter’s or PlantProd), or simply reduce fertilization for a while. This will aid in the plants’ recovery (also refer to point f).

c. Brackish or Hard Water: What might not always be obvious is that water rich in mineral salts can harm our plants. You’ve heard that we shouldn’t use mineral water in coffee makers, right? That’s because salt crystals precipitate and clog the coffee maker’s pipes. Similarly, if you water your plants with very hard water (rich in calcium, magnesium, and other salts), your plants might suffer. Test your water using aquarium kits, and if necessary, switch to filtered or rainwater, which contains fewer salts.
d. Overly Rich Substrate: It may sound counterintuitive, but an excessively humus-rich substrate can harm our plants, especially when they’ve just been replanted. When repotting your plants, take care not to use pure substrates, even if they’re labeled as “ready for planting.” Instead, mix some garden soil and sand to reduce its strength and prevent it from burning the new roots that are forming. Delicate roots submerged in a very rich substrate are a common recipe for burnt tips and paradoxically stunted plant growth.
e. Aged and Compacted Substrate: Over time, even with great care, the substrate in our pots becomes compacted, losing the organic matter that keeps it well-aerated and draining properly, while accumulating fertilizer salts. Obvious signs include leaves with burnt tips and a whitish accumulation of salts on the substrate and the walls of porous pots (made of cement, clay, or ceramic). To prevent this issue, repot your plants every one or two years to renew the substrate and pots.
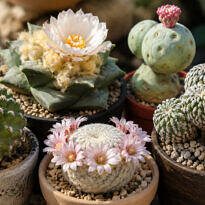
f. Inadequate Watering: It’s quite common for plant enthusiasts, especially indoor gardeners, to adopt insufficient watering practices. These are the kinds of watering that don’t thoroughly wet the substrate, and water doesn’t drain through the drainage hole. Proper drainage is essential to remove excess salts; otherwise, they accumulate and hinder plant development, as mentioned earlier. So, whenever you water your plants, water thoroughly until it drains through the drainage hole. After about 5 minutes, water a bit more to ensure the entire substrate gets moistened (often during the first watering, water ends up running down the sides without penetrating the plant’s root ball). This advice applies even to succulents. Water your plants again when the substrate dries on the surface (check with your finger). For succulents, wait until the pot is completely dry before watering again.
g. Capillary Watering: Self-watering pots are trending, relying on capillary action for irrigation. Be cautious and flush the system regularly with a standard watering, preventing salt buildup. While these pots are convenient and help keep plants hydrated, make sure they don’t harm your plants. Besides self-watering pots, be careful with “bottom watering.” While common for African violets, this method tends to accumulate salts as well. Remember to flush the substrate with a regular, abundant watering every three waterings, without using the saucer. Let the excess salts drain away.
2. Air Humidity

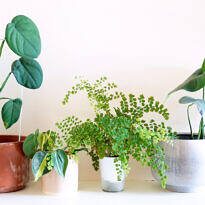
Indoor plants are typically tropical, originating from warm and humid forests. These species are well-suited to the low light conditions found in our homes. Thus, we can cultivate anthuriums, violets, ferns, palms, philodendrons, begonias, aglaonemas, and a myriad of lush, broad-leaved plants that thrive in humidity. However, indoor humidity is nowhere near what’s found in the heart of a forest. While forest humidity ranges from 60 to 90%, our homes typically maintain 20 to 40% humidity. So, how can we address this?
a. Humidifiers: These electrical devices raise air humidity. You can place them near your plants, improving the air quality for both your plants and your lungs. Just ensure proper ventilation in the area to prevent the onset of pests and fungal diseases.
b. Wet Towels: Dry your towels near the plants or grow your plants in a well-lit bathroom.
c. Tray with Rocks: Set up a wide tray filled with rocks. Keep it filled with water and place your pots on it. The natural evaporation of water will humidify the air. Remember to wash the tray every two days to prevent mosquito breeding.
d. Companion Plants: The transpiration of many tropical plants collectively elevates air humidity naturally. So, place your plants together with species featuring abundant, broad leaves, such as ferns.
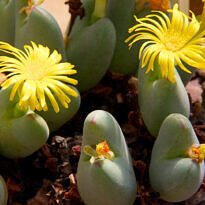
e. Turn Off the Heater and Air Conditioner: These appliances dry out the air and might not be suitable for cultivating tropical plants. If possible, reduce their usage or switch to shade-loving succulent species.
3. Cold:
Cold temperatures can also cause burns and dried tips, especially in tropical plants. Protect your plants indoors during cold winters or when frost threatens. Be cautious to prevent the plant’s leaves from touching the cold glass of windows.
4. Wind:
Tropical plants are also vulnerable here. In the heart of a forest, the wind is a cool and gentle breeze, but in our yards, the wind can easily desiccate delicate leaves. Even indoors, placing plants in spots exposed to drafts (drafty areas) can lead to dehydration, even if the soil in the pots is always moist. Plants need ventilation, but too much can harm them.
5. Heat:
Similar to cold, heat can be particularly dangerous for temperate and subtropical climate plants. Such plants often struggle to transpire enough to remove excess heat and end up suffering. Avoid planting them in positions that receive direct sunlight all day long, especially near walls or structures that absorb heat during scorching sun. Choose species better adapted to your climate and avoid insisting on cultivating plants from vastly different climates. They might struggle to adapt and could suffer, and some may even fail to flower due to differences in photoperiod.
6. Potassium Deficiency:
As discussed in the first part of the article, excess nutrients and salts are more closely related to burnt tips than nutrient deficiencies. However, when potassium is lacking, many plants will show burnt margins. If this is the case (after ruling out the previous causes), supplement your plants with potassium-rich sources such as wood ash (salt-free), banana peels, potassium chloride, or other potassium-rich fertilizers.

7. Excess Fluoride:
Tap water is treated with fluoride for our dental health, and some plants like dracaenas, spider plants, and palms might exhibit burnt leaf tips due to this element. Chlorine in water isn’t usually a problem for most plants. In this case, instead of using tap water, opt for rainwater or filtered water, both of which are fluoride-free.
8. Excessive Watering:
Another significant culprit that, like compacted soil, leads to burnt tips. When we overwater or the substrate doesn’t drain properly, pooled water in the pot prevents root aeration. Adequate aeration is crucial, and without it, roots rot. Consequently, despite overwatering, they can’t absorb water. The result is wilted and unhealthy plants. Repot or reduce watering to aid their recovery.
To Trim or Not to Trim?

Now that my plants have been affected, how can I improve their appearance? The majority of people make the grave mistake of cutting off the dry parts of the plant, creating new wounds that, when healed, also become dry, necessitating recurring trimming, especially if the underlying cause hasn’t been addressed. First and foremost, eliminate the root cause of the issue that led to the burns. Then, if you wish to enhance your plants’ appearance, trim the burnt tips, cutting within the burned area, ensuring not reach the still living parts of the plant. The result might not be perfect, but it’s healthy, won’t harm your plants, and will surely enhance their beauty.