Growing plants indoors has become a passion for many, but the success of this hobby depends on a fundamental element that is often overlooked: the potting mix. More than just “soil”, the potting mix is the medium where the roots develop and from which the plant extracts water, oxygen, and essential nutrients for its survival.
In this comprehensive article, you will learn not only what constitutes a good indoor plant potting mix but also how to prepare your own customized blends using accessible components. We will share proven recipes for different types of plants and all the necessary knowledge so that you never have to buy expensive, ready-made potting mixes again. Besides saving money, you will ensure the optimal quality and composition for your indoor plants to flourish even in indoor environments.
2. What is Potting Mix?
Difference Between Potting Mix and Soil
Many people confuse potting mix with regular soil, but they are distinct concepts. Soil is the natural ground found in gardens or fields, composed of minerals, organic matter, microorganisms, air, and water in proportions that vary by region. On the other hand, potting mix is a specially formulated blend for plant cultivation, with selected components designed to create the ideal environment for the root system.
While regular soil can compact over time, retain excess water, and contain pathogens or seeds of invasive plants, potting mix is designed to avoid these issues and provide optimal growth conditions in pots and other types of containers. Soil works well in nature, where it can complete natural cycles and replenish nutrients, moisture, and aeration without human intervention. In pots, where a protected and special cultivation is needed, and where plants cannot deepen their roots in search of water and nutrients, potting mix is perfect.
Functions of the Potting Mix
A good potting mix performs four fundamental functions:
- Aeration: Provides spaces for air circulation around the roots, essential for respiration and root system health.
- Water Retention: Maintains sufficient moisture without waterlogging, balancing water availability.
- Physical Support: Offers an adequate structure to anchor the roots and support the plant in the pot.
- Nutrition: Provides essential nutrients gradually or serves as a medium for adding fertilizers.
Why does the potting mix need to be different for indoor plants?
Plants grown in indoor environments face conditions very different from those found in nature. In pots, the volume of potting mix is limited, drainage depends entirely on the materials used, and there isn’t a continual recycling of nutrients as occurs in natural soils.
Moreover, many indoor plants are originally tropical understory species, adapted to specific moisture, drainage, and nutrient availability conditions. The suitable potting mix needs to recreate these conditions within the limitations of a pot and an indoor environment.
3. Why Use Specific Potting Mix for Indoor Plants?
Characteristics of the Indoor Environment
The indoor environment of a house or apartment presents unique challenges for plants:
- Low Light: The light intensity is generally lower, affecting plant growth and evapotranspiration.
- Reduced Airflow: Limited air circulation decreases water evaporation from the potting mix.
- Variable Humidity: Air humidity can fluctuate dramatically, especially with the use of air conditioning or heaters.
- Controlled Temperature: Fewer thermal variations compared to the outdoor environment.
These conditions directly affect how the potting mix should behave to keep plants healthy.
 Risks of Using Common Soil
 Risks of Using Common Soil
Using garden or common soil in houseplants can result in several problems:
- Fungi and bacteria: Non-sterilized soil may contain pathogens that proliferate rapidly in indoor environments.
- Pests: Insect eggs, larvae, and even earthworms may be present and cause infestations indoors.
- Compaction: Common soil tends to compact in pots, reducing aeration and hindering root development.
- Inadequate drainage: The structure of common soil usually does not provide sufficient drainage, leading to root rot.
- Salinization: The accumulation of mineral salts in pots is more problematic with common soil, which lacks components to balance this phenomenon.
Benefits of High-Quality Potting Mix
A well-formulated potting mix for houseplants offers:
- Lightness: Facilitates handling of pots and prevents compaction.
- Efficient drainage: Prevents waterlogging and root rot.
- Balanced water retention: Maintains moisture for a longer period without excess.
- Adequate aeration: Allows the roots to breathe, essential for their health.
- Balanced nutrition: Provides nutrients in just the right amount for each type of plant.
- Stability: Maintains its properties for a longer time without degrading quickly.
Advantages of Making Your Own Potting Mix
Preparing your own potting mix provides numerous benefits:
- Significant savings: Bulk components are much cheaper than ready-made mixes.
- Quality control: You select the best materials, avoiding low-quality components.
- Custom formulations: Adjust mixes according to the specific needs of your plants.
- Guarantee of composition: Exact knowledge of what is in the mix, with no surprises.
- Sustainability: Possibility to use local and recyclable materials.
- Resource utilization: Use of garden or kitchen waste as compost.
4. Main Components for Assembling Your Potting Mix
4.1 Organic Components
Coconut fiber Coconut fiber is a sustainable by-product of the coconut industry, which offers excellent moisture retention without compacting.
With a neutral to slightly acidic pH (5.5-6.8), it is ideal for most indoor plants. The fiber retains up to 8-9 times its weight in water, yet maintains good aeration among its fibers. Available in compacted blocks that expand when hydrated, it is economical and can replace peat in many mixes.
Crushed or ground pine bark Derived from the processing of pine trees, pine bark adds structure and aeration to the potting mix. As it slowly decomposes, it releases nutrients and helps maintain a slightly acidic pH (4.5-5.5), ideal for many tropical plants. Larger particles create air pockets in the potting mix, while the smaller size contributes to moderate moisture retention. It is especially beneficial for orchids, bromeliads, and plants that prefer pronounced drainage.
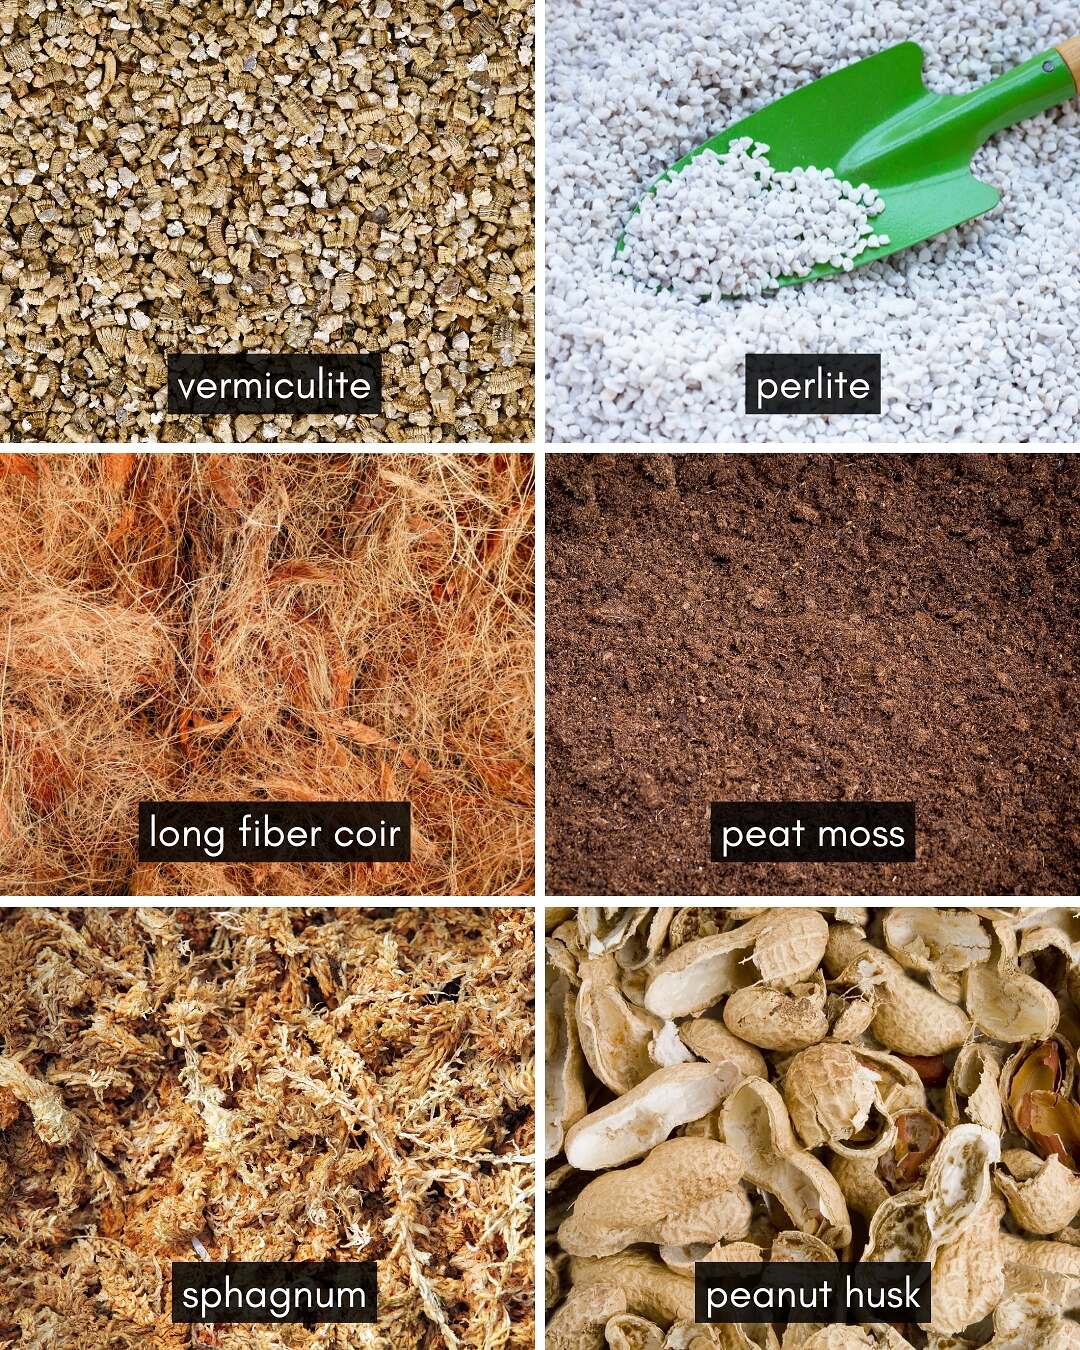 Peat Moss (Sphagnum peat moss) is a partially decomposed organic material, known for its exceptional water retention capacity (up to 20 times its dry weight). With acidic pH (3.5-4.5), it is excellent for plants that prefer acidic soils. Its fine texture fills spaces between larger particles, creating a balanced substrate. Due to environmental issues related to peat bog exploitation, many gardeners seek alternatives like coconut fiber. When used, it should be rehydrated slowly, as it can repel water when completely dry.
Composted Bark (Pine Bark Fines): Composted bark, particularly pine bark fines, is a foundational element in many commercial and custom potting blends in the U.S. It breaks down slowly, adding organic matter to the mix while maintaining structure and drainage. This makes it particularly suitable for orchids, tropicals, and plants that prefer airy root environments. Its coarse texture encourages root branching and microbial life, while helping to balance moisture retention and aeration.
Sphagnum moss Unlike peat, sphagnum moss is used in its fibrous, non-decomposed form. With its extraordinary water retention capabilities and naturally antifungal properties, it is ideal for propagation, growing sensitive plants, and as a surface component to maintain moisture. Its acidic pH (4.0-5.0) benefits plants that prefer these conditions.
It is especially valuable for orchids, carnivorous plants, and species that naturally grow on decomposing organic matter.
Well-cured organic compost Compost is fully decomposed organic matter, rich in nutrients and beneficial microorganisms. It adds natural fertility and improves the structure of the potting mix. For indoor plants, it must be perfectly cured (complete composting process) to avoid decomposition problems and odors indoors. The pH varies (6.5-7.5) depending on the materials used in composting. It is excellent for plants that require constant nutrition, but should be used sparingly in indoor mixtures (15-25% of the total mix).
Worm humus A product of the digestion of organic matter by earthworms, worm humus is extremely rich in available nutrients and beneficial microorganisms. With a pH close to neutral (6.5-7.0), it enhances the structure of the potting mix and stimulates root development. Due to its high nutrient concentration, it should be used sparingly in indoor plants (5-15% of the total mix) to avoid over-fertilization. It is particularly beneficial for plants with a high nutritional demand such as philodendrons and monstera.
Ground charcoal Crushed or small-pieced charcoal not only improves aeration but also possesses adsorbent properties that capture toxins and harmful compounds in the potting mix. With a slightly alkaline pH (7.0-8.0), it can help neutralize overly acidic substrates. Its porosity houses beneficial microorganisms and enhances the overall health of the root system. It is especially useful in terrariums and enclosed environments, where it helps to prevent the buildup of toxic gases from decomposition.
4.2 Mineral and Inert Components
Perlite Perlite is volcanic glass heated to high temperatures, creating small, light white spheres with numerous microscopic pores. Completely sterile and with a neutral pH (7.0), it is excellent for improving drainage and aeration of the potting mix. It retains a small amount of water on its surface, releasing it gradually. Its lightness (up to 80% lighter than sand) prevents compaction of the potting mix. It is essential for plants that require good drainage, such as succulents and cacti grown indoors.
Vermiculite An expandable mineral similar to mica, vermiculite is heated until it expands into accordion-shaped structures. With extraordinary water retention capacity (up to 4 times its volume), it also retains nutrients such as potassium, magnesium, and calcium, releasing them gradually. Its pH is neutral to slightly alkaline (7.0-7.5).
Unlike perlite, it retains more water than air, making it ideal for plants that prefer constant moisture. It is excellent for seed germination and rooting of cuttings.
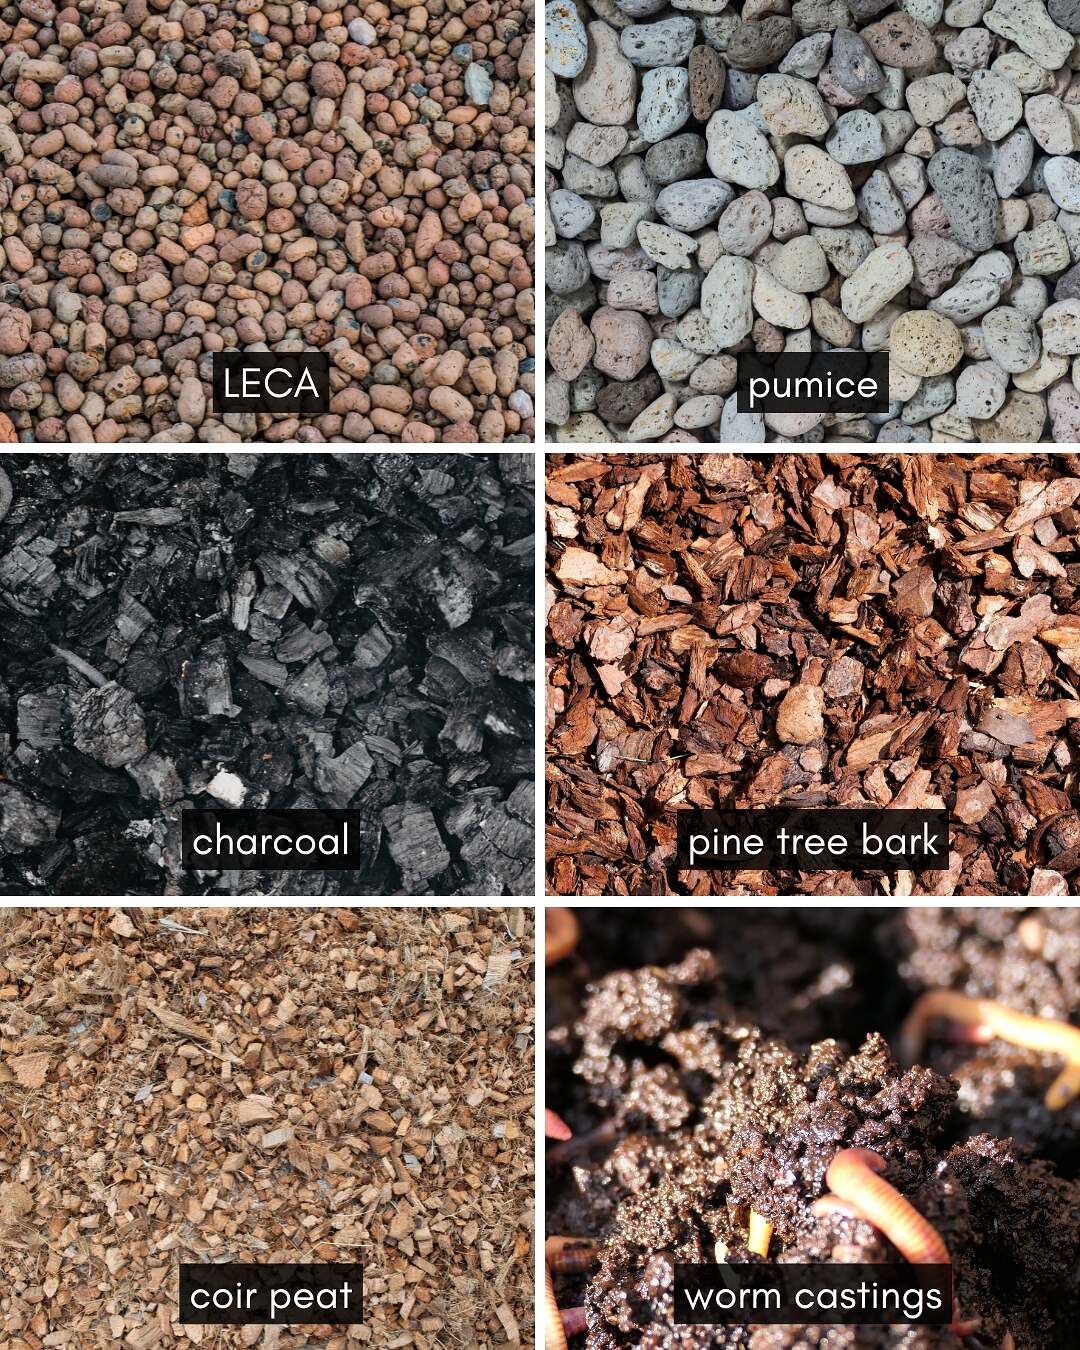 LECA (Lightweight Expanded Clay Aggregate): LECA, or lightweight expanded clay aggregate, is a reusable, sterile medium made by heating clay at high temperatures until it forms porous balls. It’s a popular choice among hydroponic enthusiasts and indoor gardeners who prioritize excellent drainage and air circulation around roots. When added to potting mixes, LECA helps prevent waterlogging, making it ideal for aroids and other plants sensitive to root rot. It can also be used at the bottom of pots to improve drainage or as a standalone medium in semi-hydroponic systems.
Pumice: Pumice is a volcanic rock that’s prized in potting mixes for its porous texture, which allows for superior aeration and water retention. Unlike perlite, pumice is heavier and less likely to float or shift in the pot, offering better long-term structural stability. It’s especially useful in mixes for succulents, cacti, and other drought-tolerant plants. Additionally, pumice contains trace minerals that can benefit soil health over time, and its natural texture supports beneficial microbial activity.
Rock dust / crushed basalt Rich in minerals and essential trace elements, rock dust is a source of extremely slow-releasing mineral nutrition. It improves the physical structure of the potting mix and adds minerals rarely found in conventional fertilizers. Depending on the source rock, it may contain more than 70 different minerals in stable forms. Its pH varies (6.5-8.0) depending on the type of rock. It is particularly beneficial in long-term mixes, where it will provide mineral nutrients for years, complementing regular fertilization.
4.3 Alternative and Sustainable Materials
Dried sugarcane bagasse A byproduct of the sugar and alcohol industry, well-cured and dried sugarcane bagasse is rich in fibers that enhance aeration and moisture retention. It must undergo an appropriate composting process before use to eliminate residual sugars that could attract pests. With a slightly acidic pH (6.0-6.5), it is a sustainable alternative to coconut fiber in sugarcane-producing regions. Its fibrous structure resists compaction and allows good air circulation in the potting mix.

Dried and chopped vegetable fibers (banana, corn) Residues from fibrous plants such as banana stalks and corn straw, when dried and ground, can partially replace coconut fiber or pine bark. These fibers enhance aeration and structure of the potting mix, gradually decomposing and releasing nutrients. It is important that they are completely dry before use to avoid premature decomposition. They are sustainable and cost-effective alternatives, especially in rural areas where these materials are abundant.
Shredded dried leaves (composted) Shredded and well-composted dried leaves are excellent sources of organic matter rich in nutrients. The composting process must be complete for use in indoor plants. Different types of leaves offer distinct properties: oak leaves decompose slowly and maintain structure for longer, while softer leaves such as those from fruit trees add nutrients more quickly. They are especially beneficial for plants with moderate moisture and nutrient needs.
Locally abundant materials Various materials available regionally can be incorporated into sustainable potting mixes.
Some examples include:
- Processed peanut hulls: Lightweight, retains moderate moisture, and improves aeration.
- Crushed macadamia shells: Extremely durable, provides excellent drainage.
- Composted acacia bark: Rich in natural tannins that help repel certain pathogens.
Using these local materials not only reduces costs but also the environmental impact of transporting commercial potting mix components.
5. Potting Mix Recipes for Indoor Plants
5.1 Universal Potting Mix (for most house plants)
This versatile recipe meets the needs of most common indoor plants, offering a balance between drainage and moisture retention.
Ingredients:
- 35% coir peat
- 20% pumice
- 15% composted pine bark
- 10% worm castings
- 10% composted bark
- 5% LECA (small particles)
- 5% ground charcoal
How to prepare:
- Pre-hydrate the coir peat as instructed on the package.
- Mix all dry components in a large container.
- Add the hydrated coir and blend well using gloves or a garden trowel.
- The final mix should be slightly moist, forming a loose clump when squeezed, but breaking apart easily.
- Allow the substrate to rest for 1–2 days in a shaded area to stabilize humidity.
Ideal for Philodendrons, pothos, syngoniums, begonias, anthuriums, and most foliage houseplants.
5.2 Potting Mix for Succulents and Cacti (indoor settings)
Focused on quick drainage and low water retention, this potting mix avoids the most common issue in succulents and cacti grown indoors: excessive moisture at the roots.
Ingredients:
- 40% pumice
- 25% LECA (crushed)
- 20% pine bark fines
- 10% coir peat
- 5% ground charcoal
How to prepare:
- Ensure all components are dry.
- Combine in a wide container, mixing thoroughly.
- The final texture should be very coarse and granular, promoting quick drainage and root aeration.
- Water sparingly at first to avoid compacting the mix.
Ideal for echeverias, haworthias, crassulas, kalanchoes, cacti, and other succulents grown indoors, where the risk of waterlogging is greater due to lower evaporation.

5.3 Substrate for Ferns (mosses and ferns in general)
Formulated for species that naturally grow in humid and rich organic matter environments such as forests, this substrate offers higher moisture retention while maintaining good aeration.
Ingredients:
- 30% coir peat
- 25% chopped sphagnum moss
- 20% vermiculite
- 10% composted pine bark
- 10% worm castings
- 5% perlite
Preparation Method:
- Hydrate the coir peat and sphagnum moss separately.
- Mix the dry components first, then incorporate worm castings and the moist materials until you achieve a uniform, spongy texture.
- It should hold moisture well but allow airflow.
This substrate is perfect for maidenhair ferns (Adiantum), bird’s nest ferns (Asplenium), staghorn ferns (Platycerium), rabbit’s foot ferns (Davallia), Boston ferns (Nephrolepis), as well as other ferns and mosses (bryophytes) sensitive to drying out.
5.4 Substrate for Aroids (Monstera, Pothos, etc.)

Developed to meet the needs of popular aroids, plants that enjoy moisture but are susceptible to root rot if kept in waterlogged substrate.
Ingredients:
- 30% coir peat
- 20% pine bark fines
- 20% composted bark
- 15% LECA
- 10% worm castings
- 5% ground charcoal
Preparation Method:
- Hydrate the coir peat.
- Mix all other ingredients, then incorporate the coir thoroughly.
- The result should feel coarse and chunky, offering space for air while retaining enough moisture.
Ideal for Monstera (Swiss cheese plant), Pothos (Epipremnum), various Philodendrons, Anthuriums, and other popular aroids in indoor environments.
This potting mix balances the need for constant moisture with the requirement for well-aerated roots.
5.5 Potting Mix for Peperomias and Pileas
Formulated to meet the specific needs of these popular indoor plants that have sensitive roots and prefer moderate humidity without waterlogging.
Ingredients:
- 30% coir peat
- 25% pumice
- 20% vermiculite
- 15% composted pine bark
- 5% worm castings
- 5% ground charcoal
Preparation method:
- Hydrate the coir peat.
- Combine the dry ingredients gently to avoid crushing pumice particles.
- Add the coir last, mixing softly.
- The substrate should be airy, with good water retention without heaviness.
This mix is especially formulated for various peperomias (Peperomia obtusifolia, P. caperata, P. argyreia, etc.) and pileas (Pilea peperomioides, P. cadierei, etc.), plants with sensitive roots that easily rot in heavy or waterlogged substrates.

5.6 Potting Mix for Indoor Palms and Dracaenas
Developed for indoor plants with deep root systems and larger sizes, this potting mix provides structural stability and controlled drainage.
Ingredients:
- 25% coir peat
- 25% pine bark fines
- 20% composted bark
- 15% LECA
- 10% worm castings
- 5% ground charcoal
Preparation method:
- Pre-hydrate the coir peat.
- Mix dry components thoroughly, then blend in the coir until the texture is cohesive and coarse.
- This mix should support tall or heavy plants in large pots.
This substrate is ideal for indoor palms (Chamaedorea, Rhapis), dracaenas (Dracaena marginata, D. fragrans), yuccas (Yucca elephantipes) and other larger plants cultivated indoors. The robust structure of the substrate supports the weight of these plants and allows for healthy root development in deeper pots.

5.7 Substrate for Orchids and Bromeliads
Developed for epiphytes that naturally grow on trees, this substrate prioritizes maximum aeration and rapid drainage, with minimal moist organic matter.
Ingredients:
- 40% pine bark fines
- 20% long coir fiber
- 15% LECA
- 15% charcoal chunks
- 5% large pumice
- 5% sphagnum moss (optional, for moisture-loving orchids)
Preparation:
- Hydrate moss if used.
- Mix all components until the texture is open, chunky, and breathable.
- Adjust the moss percentage based on species needs.
This substrate is ideal for common indoor orchids (Phalaenopsis, Dendrobium, Oncidium, Cattleya) and bromeliads (Aechmea, Guzmania, Vriesea, Neoregelia). Its high porosity emulates the natural conditions of these air-exposed plants, whose roots need to dry quickly after watering. This substrate is recommended for epiphytic plants, so do not use it for terrestrial orchids such as Cymbidium or Arundina.

5.8 Substrate for Seed Germination and Seedling Production
Seed germination and the initial growth of seedlings require a light, well-drained substrate with good moisture retention and free from pathogens. During this phase, the substrate should not be rich in organic matter or nutrients, as excess can burn the sprouts or promote fungi.
Ingredients:
- 50% coir peat
- 25% vermiculite
- 25% perlite
- Optional: 5% ground charcoal
Preparation:
- Hydrate the coir peat and fluff until crumbly.
- Mix all components well until uniform.
- Sterilize if needed by baking at 212°F (100°C) for 30 minutes to eliminate pathogens.
- Use germination trays, seedbeds, or reusable cups with drainage holes at the bottom.
After germination and the formation of 2 to 4 true leaves, transplant the seedlings to a more nutritious substrate, according to the type of plant.
Extra Tips:
- Avoid the use of humus, compost, or soil at this stage.
- Keep the substrate moist, but never waterlogged.
- Place the seedbeds in a location with good indirect light and stable temperature. If they are indoor plants, prefer to use vegetation boxes.
- Water by misting or with a sprayer to avoid displacing the seeds.

6. Step by Step: How to Make and Store Substrate at Home
Preparing substrate at home is not only economical, but also ensures total control over the quality and composition of the mix.
See how to do it correctly:
How to Sanitize Materials
Before starting any mix, it is essential to ensure that the components are free from pathogens, pests such as root mealybugs or the dreaded nematodes, and unwanted weed seeds:
- Organic materials: For components like pine bark, coconut fiber, and general husks, there are three main methods:
- Solarization: Spread the material on a black tarp, moisten lightly and cover with clear plastic. Leave in the sun for 3-5 days, when the internal temperature reaches up to 158°F (70°C), eliminating most pathogens.
- Conventional oven: Spread the material on a baking sheet and keep at 185-194°F (85-90°C) for 30 minutes. Do not exceed this temperature to avoid the release of toxic compounds.
- Microwave: For small quantities, place the lightly moistened material in a container with the lid not fully closed and heat for 2-3 minutes at maximum power.
- Mineral materials: Perlite, vermiculite, and sand can be:
- Rinsed with hot (not boiling) water
- Soaked in a solution of 1 part bleach to 9 parts water for 30 minutes, then rinsed abundantly
- Ready components: Commercial materials like worm castings and compost usually undergo processes that eliminate pathogens, but can be solarized as a precaution.

And the tannin? What to do?
During the substrate preparation, it is important to consider the presence of tannins, natural compounds found in materials like pine bark, dried leaves, tree bark such as acacia, and shredded wood, commonly used in homemade substrates. Tannins can dissolve in the irrigation water, altering the soil pH and giving the water a yellowish or brown coloration.
In excess, they can harm more sensitive plants such as orchids, violets, peperomias, and some delicate tropical species, hindering nutrient absorption and causing stress in the roots. To reduce the tannin content, it is recommended to thoroughly wash the materials before use, soaking them in clean water for 24 to 48 hours, changing the water a few times, or even boiling the husks for a few minutes.
After this process, allow the material to dry in the sun. This simple step helps to make the potting mix more neutral and safe, especially for plants grown in indoor environments with little ventilation.
Ideal Containers for Mixing
- For small amounts: Large plastic basins or organizing boxes are ideal
- For larger volumes: Folded garden tarps, wheelbarrows, or sturdy plastic boxes
- Avoid: Metal containers (they may react with acidic components) or very small ones that hinder uniform mixing
- Don’t overdo it: Too much material can be difficult to mix. If you are going to make a lot of mix at once consider renting a concrete mixer to assist in the process.
The container should have enough space to churn the mix without spilling materials and allow easy access for manipulation.
Proportions and Mixtures by Volume (Not by Weight)
In gardening, the proportions of potting mix ingredients should always be measured by volume, not by weight. Do not confuse liters (volume) with kilograms (weight) because each component has a very different density – for example, worm compost is heavy and compact, while coco coir is light and voluminous.
Moreover, the natural moisture present in the materials can drastically alter the weight, making the measurement by kilogram inaccurate and even misleading. Many products sold by weight are purposely hydrated, which increases the real cost to the consumer. Therefore, when preparing your potting mix, use equal containers (cups, buckets, pots) to measure the parts of each ingredient and ensure a balanced, economical, and reliable mix.
- Use standardized measuring containers – ice cream pots, measuring cups, or marked buckets work well
- Maintain consistency in measurements – a “cup” should always be the same size
- For recipes in percentages, convert to parts (e.g., 40% = 4 parts, 10% = 1 part)
For example, to prepare 10 liters (about 2.6 gallons) of universal potting mix (40% coco coir), you will use 4 liters (about 1 gallon) of hydrated coco coir.
Step-by-step Guide to Mixing Components
- Prepare the workspace: Choose a well-ventilated area, preferably outdoors, and wear a mask to prevent inhalation of particles.
- Hydrate the necessary components: Coco fiber and sphagnum moss must be hydrated separately before mixing.
- Organize the materials: Arrange all the pre-measured components in separate containers to facilitate mixing.
- Start with the larger components: First mix the components with the largest volume and coarsest texture.
- Add materials progressively: Continue to add components in decreasing order of volume, mixing thoroughly after each addition.
- Incorporate the finest last: Components like humus and rock dust should be added last to prevent them from settling at the bottom.
- Proper mixing technique: Use flipping movements with your hands (with gloves) or a garden spade, lifting from the bottom up and turning several times until the mix is homogeneous.
- Moisture test: The ready mix should be slightly moist—when you squeeze a handful, it should form a clump that crumbles easily when pressed, without water seeping out.
Sanitization and Sterilization of the Potting Mix
For some species of plants, especially the more sensitive and expensive ones, you may choose to sanitize or even sterilize the mixed potting mix. This technique is also interesting for seedlings, which still have few roots, seed germination boxes, and recovering plants. Try:
- Sterilization with a microwave: Place portions of the slightly moistened potting mix in microwave-safe bags with small holes for ventilation. Heat for 90 seconds to 2 minutes at maximum power for each 2 liters (about 0.5 gallons).
- Sterilization with an oven: Spread the potting mix in trays up to about 4 inches high and bake at 185°F (85°C) for 30 minutes.
Keep the potting mix slightly moist before baking.
- Boiling water treatment: Pour boiling water over the potting mix (1:1 ratio) and cover for 20-30 minutes, allowing it to cool naturally.
- Preventive treatment with natural fungicide: Mix 1 tablespoon of cinnamon powder for every 1.3 gallons (5 liters) of potting mix, or water with chilled chamomile tea before use.
How to store and how long the potting mix lasts
Well-prepared potting mixes, which are not overly moist, can be stored for future use, following these guidelines:
- Ideal containers: Buckets or plastic boxes with lids, nursery bags (not fully closed), or organizer boxes.
- Storage location: Store in a shaded, dry place protected from rain, preferably in a ventilated environment.
- Shelf life:
- Potting mix without organic components (only mineral): up to 2 years
- Potting mix with organic components: 3-6 months
- Potting mix with addition of humus or compost: ideally use within 1-2 months
- Identification: Clearly label each mix with the preparation date, composition, and which plants it is suitable for.
- Reactivation: Potting mixes stored for longer may need the addition of some fresh compost or humus before use to reintroduce beneficial microorganisms.

Precautions to avoid mold and fungi in stored potting mix
The biggest issue with storing potting mixes is the development of mold, which can be harmful to both plants and human health:
- Controlled humidity: Store the potting mix slightly moist (never soggy), just enough to prevent dust during handling.
- Periodic ventilation: Open the containers every 2-3 weeks to allow air exchange, preventing fermentation and mold.
- Addition of charcoal: Ground charcoal (1-2 tablespoons per quart) helps prevent the development of fungi.
- Monitoring: Regularly inspect the stored potting mix, discarding any portion that has a fermented odor or visible presence of mold.
- Humid climate: In very humid regions, opt to store the potting mix drier and hydrate it just before use.
Common Mistakes When Making Homemade Potting Mix
Avoiding these frequent errors can make all the difference between thriving plants and constant problems:
Using regular garden soil
The garden soil may seem like a natural option, but it poses serious problems for potted plants:
- Rapid Compaction: The structure of regular soil is not designed for the confined environment of a pot, leading to a lack of oxygen in the roots.
- Unknown Pathogens: It may contain fungi, bacteria, nematodes, and other harmful organisms that rapidly multiply in an indoor environment.
- Inadequate Water Retention: It typically retains too much water or dries out completely, with no happy medium.
- Weed Seeds: Even small amounts of soil can contain dozens of unwanted seeds.
- Unwanted Fauna: Insects, eggs, larvae, and other organisms can infest your home.
Garden soil should only be used in large pots in the garden itself, never inside the house.
Using Roadcut Soil (Full of Seeds)
Roadcut soil, often collected from slopes, is particularly problematic:
- Huge seed bank: May contain hundreds of seeds per liter, which germinate as soon as they find favorable conditions.
- Extreme compaction: Usually contains high levels of clay which compacts like concrete after a few watering cycles.
- Low fertility: Often very poor in nutrients and organic matter.
- Mineral imbalance: May contain excess of specific elements and a lack of others, making balanced plant nutrition difficult.
- Contaminants: In urban areas, it may contain toxic residues, heavy metals, and pollutants.
Excess Organic Material
One of the most common mistakes in homemade potting mixes is overdoing the organic components:
- Accelerated decomposition: In pots, organic matter decomposes much faster than in the ground, causing the substrate to settle.
- Attraction of fungi and pests: The excess promotes the development of fungi and attracts insects indoors.
- Anaerobic fermentation: Under conditions of poor aeration, produces toxic compounds for the roots and unpleasant odors.
- Excessive water retention: The heavy and constantly waterlogged substrate leads to root rot.
- Salinization: Decomposition releases salts that accumulate without the leaching that would occur in natural soil.
A good indoor plant potting mix should rarely contain more than 30% decomposable organic components.
Using Uncomposted Materials
The inclusion of fresh organic materials or those in active decomposition is extremely detrimental:
- Fruit peels and kitchen scraps: They ferment quickly, attract pests and release toxic compounds for the roots.
- Fresh manures: Contain high levels of ammonia and salts that “burn” the roots and release odors indoors.
- Uncomposted castor bean cake: Extremely toxic to roots when not fully composted.
- Fresh bone meal: Attracts rodents and other animals, and may contain pathogens.
- Green waste and fresh leaves: They consume nitrogen during their decomposition, competing with the plant.
All organic matter added to the potting mix must be fully composted, odor-free and stable.
Poor Drainage
Neglecting drainage is possibly the most fatal mistake for indoor plants:
- Suffocated Roots: Water occupying air spaces prevents root respiration.
- Root Rot: Constant moisture promotes the growth of pathogenic fungi that attack the roots.
- Spread of Fungus Gnats: Continuously moist potting mix is the perfect environment for fungus gnats.
- Accumulation of Salts: Poor drainage prevents the removal of mineral salts that accumulate and harm the plants.
- Limited Root Development: Roots avoid waterlogged areas, limiting nutrient access.
A good potting mix for indoor plants should contain at least 10-30% drainage-specific components (perlite, coarse sand, carbonized rice husk).
Storing Moist Potting Mix
Storing potting mix with excess moisture creates serious problems:
- Mold and Fungi: Ideal environment for the proliferation of potentially pathogenic fungi.
- Anaerobic Fermentation: Produces toxic compounds and unpleasant odors.
- Loss of Structure: The components degrade more rapidly, losing their physical properties.
- Development of Algae: In potting mixes stored with too much moisture and some exposure to light.
- Attraction of Pests: Moist stored potting mix attracts insects and other unwanted organisms.
Potting mix for storage should be just lightly moist (like a well-squeezed sponge).
Adding Excessive Humus
Worm humus is excellent, but in excess, it causes specific problems:
- Excess Nutrients: Causes exaggerated growth followed by deficiencies when the nutrients are depleted.
- Nutritional Imbalance: High levels of certain nutrients can block the absorption of others.
- Compaction: In large amounts, the fine humus fills the spaces between larger particles, reducing aeration.
- Excessive Water Retention: Above 20% of the mix, can retain too much water for most indoor plants.
- Unbalanced pH: Alters the acid-base balance of the potting mix, affecting nutrient availability.
Worm humus should be limited to 5-15% of the total volume for most indoor potting mixes.
Ignoring the Needs of Each Plant
Ignoring the specific needs of each plant is a fundamental conceptual mistake when preparing a single potting mix for all plants:
- Different Root Requirements: Plants with thick roots (e.g., zamioculcas) require more aeration than plants with thin, fibrous roots.
- Variable Water Needs: Ferns need a potting mix that retains more moisture, while succulents require quick-drying substrates.
- pH Preferences: Some plants prefer acidic substrates (azaleas, gardenias), others prefer neutral or slightly alkaline pH.
- Life Cycle: Actively growing plants need nutrient-rich substrates compared to dormant plants.
- Natural Origin: Desert plants and tropical rainforest plants have radically different needs.
Always adapt the potting mix to the specific needs of the plant, using basic recipes as a starting point for adjustments.
8. Extra Tips for Healthier Plants
In addition to a good potting mix, other factors are crucial for thriving indoor plants:
How to Match Potting Mix with the Ideal Pot
The type of pot directly influences the behavior of the potting mix and watering needs:
- Pots with holes: Ideal for most plants, they allow drainage of excess water. Use a potting mix with a good structure that does not drain through the holes (add a thin layer of coconut fiber at the bottom).
- Pots without holes: Require much more attention to watering. Use a more draining potting mix and add a layer of 1.2-2 inches (3-5 cm) of expanded clay at the bottom to create a reservoir for excess water, separate from the roots.
- Self-watering pots: Work well with potting mixes that have good capillarity (more coconut fiber, less perlite). Avoid too coarse components that would hinder the rise of water by capillarity.
- Porous ceramic pots (terracotta): Allow lateral evaporation, drying out the potting mix more quickly. Use mixes with greater water retention and water more frequently.
- Plastic pots: Retain more moisture. Use more draining potting mixes, especially for plants sensitive to waterlogging.
- Pot Size: Larger pots dry out more slowly and require more draining potting mixes.
Natural Cycle: For most indoor plants, renew the potting mix every 18-24 months.
- Visual Indicators: Compacted potting mix, with mosses or algae on the surface, or that repels water are signs that it needs to be replaced.
- Plant Symptoms: Stagnant growth without apparent reason, yellowing even with regular fertilization, or very slow drainage.
- Ideal Periods: Spring is the ideal time for replacement, when plants are entering a phase of active growth.
- Correct Technique: Carefully remove the plant from the pot, remove as much of the old potting mix as possible without damaging the roots, and replant with fresh potting mix, watering well after the procedure.
- Partial Replacement: For very large plants, replacing just the top 2-3 inches (5-7cm) of the potting mix and the side edges can already bring significant benefits.
How to Reuse Old Potting Mix (Worth It or Not?)
Reusing used potting mix is a controversial topic among gardeners:
When It Is Worth It:
- Potting mix from healthy plants, with no history of pests or diseases
- Mix that has not been used for more than 1-2 years
- For less demanding or temporary plants
- After undergoing a revitalization process (described below)
When It Is Not Worth It:
- Potting mix from plants that have shown diseases, especially fungal ones
- Very degraded or compacted potting mix
- For young seedlings or sensitive plants
- If there is the presence of larvae or pests
Process of Revitalizing Used Potting Mix:
- Dry it completely in the sun for a few days
- Sift to remove dead roots and very fine particles
- Add 30-50% new components, especially those improving aeration
- For each liter of reused potting mix, add:
- 1 tablespoon of ground charcoal
- 2 tablespoons of new perlite or carbonized rice husk
- 1 tablespoon of well-rotted compost or humus to reintroduce beneficial microorganisms
Adding Beneficial Microorganisms and Natural Fertilizers
Enriching the potting mix with microbial life significantly improves plant health:
- Trichoderma: Beneficial fungi that protect the roots against pathogens, available in specific commercial products.
- Mycorrhizae: Symbiotic association between fungi and roots that increases water and nutrient absorption.
Add to the potting mix at the time of planting, directly in contact with the roots. - Rhizobia: Bacillus subtilis and others available in commercial products enhance plant immunity.
- Fermented natural extracts: Occasionally water with well-diluted biofertilizer (the color of weak tea) to add microorganisms.
- Liquid vermicompost: Dilute 1 part to 10 parts water and use as a monthly watering to add both nutrients and microorganisms.
- Liquid Bokashi: Dilute 1 tablespoon of the drained liquid from bokashi composting in 1 liter (about a quart) of water to use as a monthly microbial inoculant.
Increasing the longevity of potting mix
Simple techniques can significantly prolong the lifespan of potting mix:
- Periodic looseness: Use a fork or stick to gently fluff the top layer of the potting mix every 2-3 months, being careful not to damage roots.
- Surface mulching: Add a thin layer (about 0.4 inches) of pine bark, sphagnum moss, or carbonized rice husk over the potting mix to:
- Prevent compaction from watering
- Reduce the growth of moss and algae
- Maintain more constant moisture
- Slowly add fresh organic matter
- Reduce attractiveness to pets
- Decrease the chance of contamination by Fungus Gnats flies.
- Removal of the top layer: Every 6 months, replace the top 0.8-1.2 inches of potting mix (where the most compaction occurs) with fresh material.
- Proper irrigation: Complete and less frequent watering is preferable to constant shallow watering, which causes salt buildup, reducing the durability of the potting mix.
- Occasional flushing: Every 3-4 months, water abundantly allowing plenty of water to drain through the holes, helping to wash away accumulated salts.
Adding slow-release fertilizers
Controlled-release fertilizers can be incorporated into the potting mix for consistent nutrition:
- Osmocote and Basacote: Coated pellets that release nutrients gradually over 3-6 months.
Add as per the manufacturer’s instructions when preparing the potting mix or on the surface. - Fertilizer sticks: Suitable for direct insertion into the potting mix, especially for plants that will remain in the same pot for long periods.
- Crushed rocks: Basalt powder, limestone, and other crushed rocks release minerals very slowly (over months to years), providing micronutrients naturally.
- Important care tips:
- Never exceed the recommended dosage
- Distribute evenly through the potting mix
- Avoid direct contact of the granules with the roots
- Record on a calendar when it was applied to avoid reapplication before the recommended time
9. Frequently Asked Questions
Can I use regular soil?
It is not recommended to use common garden soil for indoor plants. Garden soil:
- Easily compact when confined in pots
- May contain pathogens, unwanted seeds, and insects
- Does not provide the necessary drainage in the confined environment of a pot
- Tends to retain excessive water or dry out completely
If you really need to use garden soil in an emergency, mix at least 50% drainage components (perlite, charred rice husk) and consider sterilizing it in an oven before use (194°F (90°C) for 30 minutes).
Does potting mix replace fertilizer?
Not completely. Even the best potting mix will eventually have its nutrients depleted:
- The potting mix provides an ideal physical structure and initial nutrients
- Most organic components of the potting mix release nutrients only for 3-6 months
- Actively growing plants will need supplementary fertilization after this period
- Use diluted liquid fertilizers every 15-30 days during the growing season
- Slow-release fertilizers can be added to extend the nutrition period
The ideal potting mix provides the environment for roots to efficiently absorb nutrients, but it does not replace a regular fertilization program.
Is it safe to use homemade composting?
Yes, with some important precautions:
- The composting should be completely finished (appearance of dark soil, unrecognizable original materials, no unpleasant odor)
- It should be “cured” for at least 3-4 months after the active decomposition phase
- It’s safer for outdoor plants or hardy plants
- For sensitive or valuable plants, consider sterilizing the compost (oven at 185°F (85°C) for 30 minutes)
- Use in moderate proportions (10-15% of the total mix)
- Avoid compost that contains meat scraps, dairy products, or pet waste for use in indoor plants
Well-made compost is an excellent organic component, rich in nutrients and beneficial microorganisms, but should be used cautiously for indoor plants.
How often do I need to change the potting mix?
The ideal frequency of change varies depending on the type of plant and conditions:
- Fast-growing plants (philodendrons, pothos): Every 12-18 months
- Medium growth plants (zz plants, snake plants): Every 24-36 months
- Slow-growing plants (cacti, succulents): Every 3-4 years, or when the potting mix begins to compact
Factors that indicate the need for a change before the expected time:
- Potting mix that no longer drains properly (water remains on the surface)
- Visible compaction or potting mix pulling away from the sides of the pot
- Plant has stopped growing for no apparent reason
- Roots appearing in the drainage holes or on the surface
- Emergence of algae, moss, or fungi on the surface
Partial renewal (top layer) can be done annually, even for plants that do not need a full change.
How to Know if the Potting Mix is Wrong for Your Plant?
Observe these signs that indicate problems with the potting mix:
Signs of overly compacted potting mix with poor drainage:
- Yellowed leaves throughout the plant
- Lower leaves that wilt and fall off
- Dark or softened spots at the base of the stems
- Surface of the potting mix remains moist for more than 2-3 days
- Moldy or fermenting odor
- Appearance of fungus gnats
- White mold on the surface of the potting mix
Signs of potting mix with excessive drainage:
- Frequent wilting, even with regular watering
- Leaves with dry tips or edges
- Slow or stunted growth
- Need for very frequent watering (every 1-2 days)
- Water that passes quickly through the pot without being absorbed
- Dry roots or very limited growth
The ideal potting mix allows the plant to maintain constant growth, with vibrant and healthy colored foliage, and the drying time between waterings should be approximately 7-10 days for most common indoor plants.
10. Ready to Get Started?
Creating your own potting mix for indoor plants is more than a way to save money—it’s taking total control over the environment where your plants thrive. Throughout this guide, we explored the fundamentals of good potting mix, essential components, and techniques for preparing specific mixes for different types of plants.
Revisiting the main topics:
- The ideal potting mix is not just soil, but a carefully formulated mixture that provides support, aeration, drainage, and nutrition.
- Different plants have different needs—succulents require more drainage, while ferns prefer more moisture.
- Quality components are crucial: coconut fiber, perlite, pine bark, and other specific materials create an ideal environment for the roots.
- The most common mistakes include excessive organic matter, lack of drainage, and use of common soil—avoiding them is key to success.
- Proper maintenance, including periodic renewal and care with storage, prolongs the potting mix’s lifespan.
Remember that gardening is an experimental science by nature. The recipes presented are excellent starting points, but do not hesitate to make adjustments as you observe the behavior of your plants. Over time, you will develop an intuitive understanding of the specific needs of each of your indoor plants.
Cultivate with joy knowing that, by preparing your own potting mix, you are providing your plants with the best possible environment to flourish, even indoors. And remember: a good potting mix is the invisible foundation for visibly stunning plants.
Save this article for future reference and share it with other plant lovers. Your plants will thank you!